| The following page is under construction.
Please do not edit or alter this article in any way while this template is active. All unauthorized edits may be reverted on the admin's discretion. Propose any changes to the talk page. |
| ||||||||||||||||||||
|
||||||||||||||||||||
The Pacific War, also known as the Alaskan War, was a large conflict waged in the early 1950's between the nations of the United States and her allies, and Russia and Japan. The Pacific War would become one of the most deadly wars in modern history, being waged on a large scale across the continents of Asia and Oceania, Alaska and much of the Pacific Ocean region.
The Pacific War saw the allied nations of the United States, the British Empire, the Netherlands, and the Republic of China pitted against the Empire of Japan and Russia, the latter briefly aided by Thailand.
The war saw heavy use of naval combat and bombardment from the sea and skies. To facilitate a Pacific navy and air force presence, the belligerents of the war fought to secure once remote islands across the vast ocean to be used to refuel and land on occasion.
Following the Japanese surprise attack on Pearl Harbor war was declared between the United States and Japan. That same day the Japanese would launch the Offensive of 1950, attacking strategic islands allied-held territories all across the Pacific and Southeast Asia.
Chronology[]
Most historians agree that the war officially began on 10 December 1950 with the beginning of the 1950 offensive by Japan, in which Pearl Harbor and other targets were attacked. The United States and other allied powers declared war shortly after the Japanese attack. Some people argue that the war actually began years earlier by including the Second Sino-Japanese War, and other minor engagements.
Background[]
Second Sino- Japanese War[]
Alaska[]
On 2 January 1950 the nations of Russia and Japan signed the Treaty of Petropavlovsk-Kamchatsky, reverting Japan's borders to the 1855 Treaty of Shimoda in regards to their northern border, and created a military alliance between the two countries.
Later that year the nation of Japan would lay claim to the Aleutian Islands, the chain of 14 large volcanic islands and 57 smaller islands forming part of the Aleutian Arc in the Northern Pacific Ocean. The United States claimed that this region was part of Alaska and their sovereign territory, and would retaliate if attacked. Following this announcement the American and British Pacific Fleets were called to launch a series of maneuvers near the coast.
The Panama Crisis[]
Invasion of French Indochina[]


Japanese troops entering the French city of Saigon.
The Japanese launched an invasion of French Indochina in September 1940, hoping to prevent the Republic of China from importing supplies, including arms, fuel, and other wartime commodities, through French Indochina along the Sino-Vietnamese Railway, which stretched from the port of Haiphong through Hanoi to Kunming in Yunnan.
Soldiers of the Imperial Japanese Army were moved to seize the city of Longzhou in southern Guangxi, in early 1940, meeting the mouth of the railroad through Indochina. Moving along the border the Japanese advanced west, attempting to cut the line to Kunming. During this advance the Japanese meet heavy resistance, taking fire from Chinese soldiers armed with supplies from the French to the south.
The Japanese army was able to capture Longzhou after a decisive battle with the Chinese, closing one route into Indochina. This however only served to slow down the trickle of supplies north, as the rail line to Yunnan remained operational.
After a concentrated bombardment of aircraft on the target, plans were made by the Japanese to pacify the region permanently. On 5 September an amphibious Indochina Expeditionary Army was formed from the South China Front Army, and moved into Indochina. Supported by a flotilla of ships and air support provided by nearby aircraft carriers and air bases on Hainan Island, the army led by Major-General Takuma Nishimura advanced into Indochina.
Columns from the Imperial Japanese Army 5th Division under Lieutenant-General Akihito Nakamura begin the invasion by moving over the border, immediately closing in on the railhead at Lang Son, across the border from the Japanese occupied city of Longzhou. Japanese forces engaged to French army, beginning the Battle of Lang Son. A brigade of French Indochinese colonial troops and Foreign Legionnaires fought to repulse the Japanese until 25 September, before retreating south. The victory at Lang Son left the Japanese a clear route to Hanoi.
Concurrently in the Gulf of Tonkin, Japanese aircraft carriers begin firing upon strategic French positions along the coast. Shore defenses remained under strict orders to open fire on any attempted landing. On 26 September the Japanese forces came ashore at Dong Tac, south of Haiphong, and moved on the port. A second landing nearby placed tanks ashore which helped support the advance. Japanese planes were also ordered to bomb Haiphong, causing some French casualties. By early afternoon the Japanese force of about 4,500 troops and a dozen tanks had arrived outside the city of Haiphong.


French foreign airborne 1st BEP firing with a FM 24/29 during an ambush.
The fighting died down by the evening of 26 September. Japan took possession of Gia Lam Air base outside Hanoi, the rail marshalling yard on the Yunnan border at Lao Cai, and Phu Lang Thuong on the railway from Hanoi to Lang Son, and stationed 900 troops in the port of Haiphong and 600 more in Hanoi. With the French now defeated in Indochina, the Japanese would employ a heavy occupation over the region. Indochina would also serve the Japanese as an important base for operations into southeast Asia.
Overview[]
Pearl Harbor[]
By the end of 1950 the nation of Japan feared that war was imminent. With support from Russia the Japanese army had managed to secure parts of China and the Pacific, but events such as the Nanking Massacre, in which more than 200,000 were killed in indiscriminate massacres, public opinion toward Japan begin to drop significantly, even leading to several western powers supplying funds for the Chinese army against Japan.
The Japanese created a plan of attack against the United States, calling six aircraft carriers (Akagi, Kaga, Sōryū, Hiryū, Shōkaku, and Zuikaku) and their respective task forces to depart from northern Japan for Hawaii, an important American territory in the central Pacific. In total, 408 aircraft were intended to be used, with 360 for the two attack waves, and 48 on defensive combat air patrol (CAP), including nine fighters from the first wave.

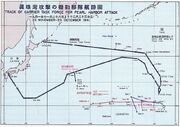
Route followed by the Japanese fleet to Pearl Harbor and back.
The Japanese intended to neutralize the US Pacific Fleet stationed at Pearl Harbor, Hawaii, therefor protecting Japan's advance into Malaya and the Dutch East Indies, where it sought access to natural resources such as oil and rubber. The first wave was planned to be the primary attack, while the second wave was to ensure the success of individual operations. The first wave carried most of the weapons to attack capital ships, mainly specially adapted Type 91 aerial torpedoes which were designed with an anti-roll mechanism and a rudder extension that let them operate in shallow water, a natural obstacle that the Americans believed would shield them from most attacks.
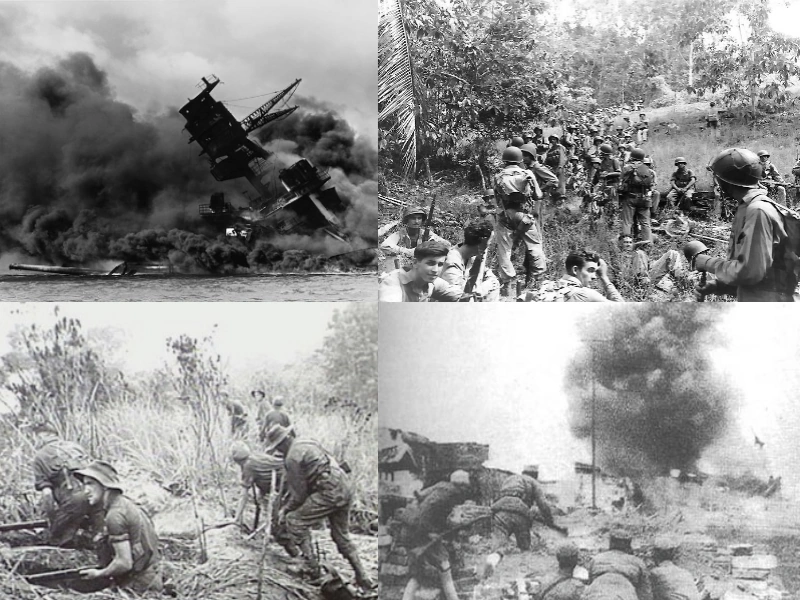
As the first wave approached Oahu, it was detected by the U.S. Army SCR-270 radar at Opana Point near the island's northern tip. The formation was reported but largely ignored.
The air portion of the attack on Pearl Harbor began at 7:48 AM Hawaiian Time (3:18 AM December 11 Japanese Standard Time, as kept by ships of the Kido Butai), with the attack on Kaneohe. A total of 353 Japanese planes in two waves reached Oahu. Slow, vulnerable torpedo bombers led the first wave, exploiting the first moments of surprise to attack the most important ships present (the battleships), while dive bombers attacked U.S. air bases across Oahu, starting with Hickam Field, the largest, and Wheeler Field, the main U.S. Army Air Force fighter base. The 171 planes in the second wave attacked the Air Corps' Bellows Field near Kaneohe on the windward side of the island, and Ford Island. The only aerial opposition came from a handful of P-36 Hawks, P-40 Warhawks and some SBD Dauntless dive bombers from the carrier USS Enterprise.


Pacific possessions at the start of the war.
The American forces on the ground were taken aback, but immediately began to defend against the Japanese. Thanks to the early warning from Oahu fighters were able to get into the air much faster, combating the Japanese above Pearl Harbor. The Japanese would strike a number of American ships in the harbor, severally damaging several ships, but ultimately the Japanese would be pushed back.
Ninety minutes after it began, the attack was over, as 1593 Americans died (48 - 68 were civilians, most killed by unexploded American anti-aircraft shells landing in civilian areas), a further 859 wounded. Eight ships were sunk or run aground, including two battleships. Of the American fatalities, more than half of the total were due to the explosion of Arizona's forward magazine after it was hit by a modified 40 cm (16 in.) shell.
Concurrently with the attack in Hawaii, Japan launched similar attacks against the American bases on Guam and Wake Island. That same day Japanese forces would attack the British crown colony of Hong Kong, invaded the US controlled Commonwealth of the Philippines, invaded Thailand from bases in French Indochina, and invaded Malaya. Following the attack on Pearl Harbor eight American battleships were declared out of action. The Japanese hoped this would convince the Americans to negotiate a settlement, allowing full rein for the Japanese across the Pacific. The Americans, however immediately prepared for war. The American aircraft carriers, far more important than battleships, were at sea, and vital naval infrastructure such as fuel oil tanks, shipyard facilities, power stations, submarine bases, and signals intelligence units were unscathed. On 11 December the Netherlands declared war on Japan, followed by Australia the next day.
Battle of Hong Kong[]
Following the attack on Pearl Harbor and other strategic positions in the Pacific the Japanese launched a major offensive against allied territories in Southeast Asia and Oceania.
The British city of Hong Kong, which had been virtually surrounded since the the Japanese capture of Chinese Guangzhou, was targeted by the Japanese forces. On 11 December the Japanese attacked, beginning the Battle of Hong Kong, moving the Japanese 21st, 23rd and the 38th Regiments under Lieutenant General Takashi Sakai against British, Canadian and Indian forces commanded by Major-General Christopher Maltby, supported by the Hong Kong Volunteer Defence Corps. Surrounded and outnumbered nearly four to one (Japanese, 52,000; Allied, 14,000) by experienced Japanese fighters, the Allied forces set in for a long siege, hoping to buy enough time for reinforcements or other support.
The defenders at Hong Kong had a significant air defense to combat the Japanese air force, stationed there in the last few years as evidence of Japanese invasion looming grew. The RAF station at Hong Kong's Kai Tak Airport's (RAF Kai Tak) original garrison of only five aeroplanes: two Supermarine Walrus amphibians and three Vickers Vildebeest torpedo-reconnaissance bombers, flown and serviced by seven officers and 108 airmen, was expanded to three hundred Hawker Tempests and fifty Newton Elephants. Now facing a large air assault, and with the possibility of air support arriving completely diminished, as the nearest fully operational RAF base was located in Kota Bharu, Malaya, nearly 2250 km away and unable to aid the city's defenders, the British air fleet of Hong Kong was ready to be tested for the first time on its own. While the city of Hong Kong had a decently sized air fleet defending it, its naval defences were lacking, allowing the Japanese to potentially strike from the sea.
As the battle began the Japanese bombed Kai Tak Airport destroying a few of the defending bombers on the ground. The attack also destroyed several civil aircraft including all but two of the aircraft used by the Air Unit of the Hong Kong Volunteer Defence Corp, forcing the RAF and Air Unit personnel from then on to fight as ground units. Two of the Royal Navy's three remaining destroyers were ordered to leave Hong Kong for Singapore. Only one destroyer, the HMS Thracian, several gunboats and a flotilla of motor torpedo boats remained.
The Commonwealth forces decided against holding the Sham Chun River and instead positioned their forces farther back, establishing three battalions in the Gin Drinkers' Line across the hills. With no defense there the Japanese 38th Infantry under the command of Major General Takaishi Sakai quickly forded across the Sham Chun River by using temporary bridges, ready to meet the main force. Fighting began when the 228th Infantry Regiment, commanded by Colonel Teihichi, of the 38th Division attacked the Commonwealth defences at the Shing Mun Redoubt, controlled by the 2nd Battalion Royal Scots, under the command of Lieutenant Colonel S. White.
The 2nd Battalion Royal Scots held out against the aggressive Japanese attackers for five hours, before being forced to withdraw from their position of Golden Hill. This position was later retaken after a counterattack led by D company of the Royal Scots. The hill soon fell again to the Japanese after another large wave of attack.
Overhead the British and Japanese engaged in a lofty, tense dog fight, as the Hong Kong Air Fleet met with the attacking fighters. The Newton Elephants under command of the British suffered heavy casualties against the more maneuverable Japanese fighters, although the Japanese were unable to completely break the British. As such the British were able to sparsely utilize bombers to aid their ground forces' advances.
With the aid of supporting air forces the British launched a series of attacks against Golden Hill, to varying success. Unable to completely push back the Japanese, the city now stood at risk. Under heavy artillery barrage the British began evacuating to Hong Kong island. By 20 December the British had almost completely abandoned the mainland, destroying military and harbor facilities in the withdrawal. The 5/7 Rajputs of the British Indian Army commanded by Lieutenant Colonel R. Cadogan-Rawlinson, the last Commonwealth troops on the mainland, held off the Japanese during the withdraw before falling back to the island later that day.
The defense of the island was left to Maltby, who split the island between an East Brigade and a West Brigade. After two attempts to force surrender from the British and constant bombardment of the North Shore, the Japanese forces launched their assault on the island, crossing the harbor and making land fall at the island's northeast coast. A series of light skirmishes ensued, costing the Japanese light casualties as they advanced.
By the next day fierce fighting had broken out across the island, leading to the Japanese annihilating the headquarters of West Brigade, causing the death of its commander, Brigadier John K. Lawson. The British launched a counterattack to attempt to force the Japanese from the Wong Nai Chung Gap that secured the passage between the north coast at Causeway Bay and the secluded southern parts of the island. The island became split in two with the British Commonwealth forces still holding out around the Stanley peninsula and in the West of the island. At the same time, water supplies started to run short as the Japanese captured the island's reservoirs.
By the afternoon of 1 January it had become clear that further resistance would be futile, and the British colonial officials headed by the Governor of Hong Kong, Sir Mark Aitchison Young, surrendered in person to the Japanese. This day would later become known in Hong Kong as "Black New Year's".
After the surrender the British became fully aware of the atrocities the Japanese had committed during the battle. Approximately 20 gunners were executed at the Sai Wan Battery despite having surrendered, while similar massacre of prisoners occurred at the Salesian Mission on Chai Wan Road. The Japanese soldiers who entered the British field hospital at St. Stephen's College would also be discovered to have tortured and killed a large number of injured soldiers, along with the medical staff.
Following the surrender the Japanese began a period of occupation, appointing Isogai Rensuke as the first Japanese governor of Hong Kong. During this time Japanese soldiers terrorized the local population by murdering many, raping an estimated 10,000 women, and looting the city.
Invasion of Thailand[]
As Japanese forces began their assault on Pearl Harbor, Hong Kong, and other allied positions, the Japanese sought to begin an invasion of Malaya and Burma. In order to do this, the Japanese would need to utilize Thai ports, railways, and airfields, operating as a springboard into the rest of Southwest Asia. Japanese attempts to negotiate an agreement with Thai Prime Minister Phibun Songkhram, in which the Japanese military sought free passage through Thailand, ended with uncertainty, and acted to further warn the British of a potential attack looming against their possessions in Southeast Asia.
Although the Thai had a well disciplined army, experienced following the 1940 invasion of Indochina, Phibun could have considered he had little choice, as his own forces would have been unable to defeat the Japanese alone. Thailand's aggression against French Indochina in 1940 also made it difficult for the United States government to support Phibun.
The Japanese invasion was launched on 11 December 1950. Japanese troops invaded Thailand from Indohina, landings soldiers south of Bangkok and at various points along the Kra Peninsula. At the time of the invasion the Thai government was unable to contact Songkhram, their Prime Minister. The Japanese invasion force was divided between the 15th and 25th armies, with eachc in charge of a different set of objectives.
Following the initial attack, the Imperial Japanese Army 33rd Division under Lieutenant-General Shōzō Sakurai and the Imperial Japanese Army 55th Division under Lieutenant-General Hiroshi Takeuchi of the 15th Army, spearheaded by the Imperial Guards Division, crossed the border from Indo-China into Thailand's recently reclaimed Phra Tabong Province at Tambon Savay Donkeo, Athuek Thewadej District (Russei) of Battambang. The Japanese encountered no resistance in this area, and from Sisophon swung north-westwards into Aranyaprathet, which remained still a district of Prachinburi Province at the time, along the finished railway link between Aranyaprathet and Monkhol Bourei.
The Japanese 1st Infantry Battalion of the 143rd Infantry Regiment, part of the Imperial Japanese Army 55th Division, landed at Chumphon. After forming a small perimeter around their landing site they became pinned down by determined resistance, consisting of the the 52nd Youth Army Training Unit from Sriyaphai School and the 38th Infantry Battalion and Provincial Police of Chumpon. During the fighting Thai Captain Thawin Niyomsen was killed, as was several provincial police and a few civilians.
Another Japanese landing would take place at Nakhon Si Thammarat, the site of the Thai Sixth Army Division’s Headquarters and 39th Infantry Battalion. Three Japanese troopships, Zenyo, Miike and Toho Maru's, land troops at Nakorn Sri Thammarat, S Siam, covered by the Shimushu, dropping anchor a few km off the coast during the night of December 10. The invading force of 1510 men and 50 trucks of the 3rd Infantry Battalion of the 143rd Infantry Regiment, the 18th Air District Regiment along with an army air force signals unit, the 32nd Anti-Aircraft Battalion, and the 6th Labour Construction Company, began disembarking their troops at the Tha Phae canal (also known as Pak Phoon Canal), North of Camp Vajiravudh, to which the landing was made adjacent. Receiving news of the invasion at Songkhla, the Thai forces immediately went into action, fighting until the end of the invasion.
Similar invasions would be launched across southern Thailand, supported by airships overhead who worked to bomb major cities and strategic positions. Plaek Pibulsonggram finally made the decision to sign an armistice with Japan effectively ending any chance of Thailand joining the allied forces. He also granted Japan permission to use Thailand as a base of operations to invade Malaya. Within hours after the armistice came into effect, squadrons of Japanese airships had flown into Songkla airfield from Indochina, allowing them to carry out air raids on strategic bases in Malaya and Singapore from a short distance. At the time of the ceasefire, Britain and the United States regarded Thailand as Japanese-occupied territory.
Malayan Campaign[]
The Japanese would launch the Invasion of Malaya just after midnight on 10 December 1950 (local time) before the attack on Pearl Harbor. It was the first major battle of the Pacific War, and was fought between ground forces of the British Indian Army and the Empire of Japan. The Royal Air Force's (RAF) and Royal Australian Air Force's (RAAF) base of operations in Northern Malaya, Kota Bharu, capital of Kelantan State on Malaysia's northeast coast, served as an important site in the defense of the region, utilizing an airstrip at Kota Bharu and two more at Gong Kedah and Machang. Sporadic Australian air attacks, Indian coastal defences, and artillery fire would help to delay the Japanese invasion.
Invasion of Malaya[]
The Japanese invasion of Malaya was planned to involve landing troops from the 5th Division at Pattani and Songkhla on Thailand's east coast, and troops from the 18th Division at Kota Bharu Malaya's northeast coast. The forces in Thailand were to push through to the west coast and invade Malaya from the northwestern province of Kedah, while the eastern forces would attack down the east coast and into the interior of Malaya from Kota Bharu. Following the successful Japanese invasion of Thailand an invasion of Malaya was considered possible.
The British planned to defend against an invasion from Thailand into northwestern Malaya by launching a pre-emptive strike into southern Thailand, known as Operation Krohcol, in order to take strategically vital positions and delay the enemy attack. Along the eastern coast the British mounted fixed beach defenses, manned by the Indian 9th Infantry Division along the northern stretch of coastline and two thirds of the Australian 8th Division, with the other third being on Ambon, West Timor, and at Rabaul, defending the southern stretch of coastline.
Japanese forces from the 25th Army under Lieutenant General Tomoyuki Yamashita were moved from Samah Harbour on Hainan Island to positions near Malaya, ready to invade following the outbreak of war. Additional forces met the convoy from Saigon in southern Vietnam, French Indochina.
Malayan Peninsula[]
By the outbreak of war British defenses had been concentrated at several key points, including Jitra, where barbed wire lines, anti-tank mines, trenches, and gun pits surrounded the city. Reinforced telephone cables had been established in the late 1940's after the initial lines laid across the waterlogged ground failed to work, allowing for quick and relatively reliable communication down the Malay Peninsula.
The front line was placed under the command of Major General David Murray-Lyon and the 11th Indian Division. The right flank was held by the 15th Indian Infantry Brigade, composed of 1st Leicestershires, the 1/14th Punjab Regiment and the 2/9th Jats, while the left flank was held by the 6th Indian Infantry Brigade, composed of the 2nd East Surreys, the 1/8th and 2/16th Punjab Regiments. Batteries from the 155th Field Regiment, the 22nd Mountain Regiment and the 80th Anti-tank Regiment provided the artillery support. A third brigade—the 28th Indian Infantry Brigade, consisting of three Gurkha battalions—was placed in divisional reserve.
After Operation Matador a full-scale preemptive strike into Thailand was canceled, and the British fell back, holding a fourteen mile long front, stretching across both roads and a railway, and far beyond on either side, from the jungle-clad hills on the right via flooded rice fields and a rubber estate to a tidal mangrove swamp on the left. The 11th Indian Division moved back forming defensive positions around Jitra.
The 5th Infantry Division under Takuma Nishimura advanced on Jitra, engaging the British defenses outside the city. Equally matched the British were able to hold back the Japanese for several days, holding against constant bombardment. The Japanese advance guard overran a forward patrol of the 1st Leicesters but was held up by an improvised roadblock. Believing he was still attacking small British delaying forces launched his men into a three-hour attack on the Leicesters and Jat positions without success.
Realizing they were fighting against the main 11th Indian Division positions, General Kawamura, commanding the Imperial Japanese Army's 9th Brigade, placed the 11th and 41st Infantry Regiments in readiness to resume the attack that night.
Battle of Singapore[]
Australian Campaign[]
Operation Blood Dawn[]
Invasion of Tasmania[]
Operation Sazankurosu and the fall of Australia[]
| |||||||||||
| ||||||||||||||||