| |||||||||||||||||||||||||||||||||||
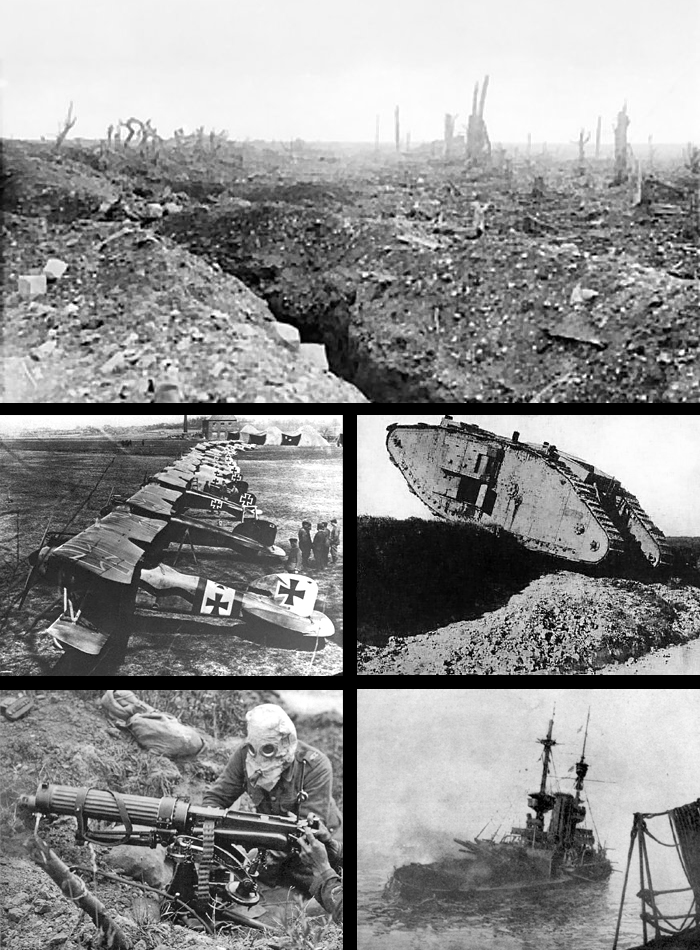
World War I also called the Great War or World War prior to 1939, and First World War interchangeably since then, was a global military conflict fought around the world but centered in Europe between July 28, 1914 and November 11, 1918. It involved a large number of the world's great powers who fought in two opposing alliances, the Allies with Great Britain, France and Russia, and the Central Powers, composed mainly of Germany, Austria-Hungary, Italy, and the Ottoman Empire. Ultimately almost all of Europe was drawn into the war and in total around 70 million soldiers were mobilized in one of the largest wars in history. More than nine million combatants were killed with significant civilian casualties also suffered on both sides due to atrocities committed by the combating nations. The high casualties are attributed to new technologies and methods of war, old tactics from the 19th century early in the war and an increase in technology without corresponding improvements in protection or mobility for soldiers.
Long term imperialistic and nationalistic goals are considered to be the main causes of the war, as it broke out between Serbia and Austria-Hungary in July 1914 after Serbian nationalists killed a prince of the Austro-Hungarian Empire in Sarajevo, Bosnia. The subsequent political alliances that entangled Europe and Asia lead to the wide-scale of the war as Austria-Hungary posed to Serbia an outrageous ultimatum, which lead to a declaration of war by Austria-Hungary, Russia declaring war in Serbia's defense, and the remainder of joining nations did so early in the war after this. The German Empire, Austria-Hungary, Bulgaria, the Ottoman Empire, and the Kingdom of Italy formed the Central Powers, named so because of their position in central Europe. The Entente (Allies) were made up of Great Britain, Russia, France, Serbia, Montenegro, Greece, and eventually Japan, Belgium, and Romania.
The war opened on July 28, 1914 when Austria-Hungary invaded Serbia, then followed by a German invasion of the neutral nations of Belgium and Luxembourg to achieve the Schlieffen Plan and invade France. After the German march on Paris was halted at the First Battle of the Marne River, a series of trench line defenses spread across Western Europe and turned into the stagnant trench warfare that would go on to define the war. In Eastern Europe the war was much more dynamic as lines constantly shifted between Germany, Austria-Hungary, and Russia. After the a subsequent Allied failure to knock the Ottomans out of the war in the Gallipoli campaign, the war spread to the Middle East as the British and Ottomans with their German allies fought a battle over Mesopotamia and Egypt. Eventually in 1917 the Russian Revolution knocked Russia out of the war, followed by the German Spring Offensive of 1918, which subsequently knocked France out of the war, the Allies fell one by one. By the summer of 1918, only the United Kingdom was left on the Allied side, and they themselves surrendered after an extensive German bombing campaign and naval and submarine blockade.
After the war the Russian Empire, Kingdom of Serbia, Kingdom of Montenegro, and the Grand Duchy of Luxembourg all ceased to exist. The Treaty of the Versailles was signed on June 28, 1919 in the Palace of the Versailles in France, dictated by the victorious Central Powers. The political map of Europe changed significantly as new nations were carved out of Eastern Europe and Bulgaria and Austria-Hungary made gains in the Balkan Peninsula. The reparations and economic and political backlashes that would occur following the Treaty of the Versailles would eventually go on to be some the recognized main causes of the Second World War.
Background
The background of the First World War goes back to the Napoleonic Wars of 1803-1815 when Napoleon spread the First French Empire to its maximum extent and with it the Napoleonic Code and lead to a flare in nationalism. As nationalism spread it would reach far and wide into Europe, especially in the ethnically-diverse Balkan Peninsula dominated then by the Austrian and Ottoman Empires. As Serbia, Montenegro, and Greece achieved independence in the 19th century and the Hungarians achieved co-habitation with the Austrians in the establishment of the Austro-Hungarian Empire. Eventually it was these nationalistic tensions in Southern Europe that would explode in 1912 into the Balkan Wars, one of the direct causes of the First World War.
After the Young Turks Revolution of 1908 forced the Ottoman Sultan, Abdul Hamid II, to reinstate the Turkish Parliament, the enemies the Ottomans had garnered or simply pondering European nations looked to the Ottomans as an easy target. Later in 1908 the Bulgarians declared their independence from the Ottomans which they had been guaranteed in the 1878 Treaty of San Stefano, as the weak Ottomans had been unprepared to stop them, the Bulgarians gained independence and were rapidly recognized by the Russian Empire and Austria-Hungary. Italy then saw this as their chance to attack the Ottomans and seize Libya from them, and in the subsequent Italo-Turkish War of 1911-1912, the Italians gained the Turkish provinces of Tripolitania, Cyrenaica, and Fezzan along with the Dodecanese Islands in the Eastern Mediterranean. Turkey was humiliated by yet another quick defeat by a young European nation, but by far the worst was yet to come.
In 1912 the Balkan League composed of Serbia, Montenegro, Bulgaria, and Greece took advantage of the Ottoman's ill fortune and began the First Balkan War. They quickly defeated the Ottoman Army, by this point severely ill-equipped and untrained in warfare. The Peace of London that followed allotted most of the Ottoman territory left in Europe to the victorious powers, but left Bulgaria, by far the most powerful of the victorious powers, feeling it wasn't being given enough land. Thus they then launched the Second Balkan War, which Bulgaria began to lose after its Army had become overwhelmed and overextended. Germany intervened diplomatically and, with Russia, was able to negotiate the Treaty of Bucharest, signed on August 10, 1913.
Serbia won Macedonia from the Bulgarians in the Treaty of Bucharest, and after this felt more confident in pursuing its nationalist, Pan-Yugoslavic goals. Nationalists look to Austria-Hungary, which was then still home to a significant Serbian population, and sought separation of the Serbian regions in Austria-Hungary from the Empire and to transfer it to the Kingdom of Serbia. Ultimately it was these nationalists that began World War I when the Black Hand organization assassinated Prince Charles of Austria in Sarajevo, Bosnia, by Gavrilo Princip which lead Austria-Hungary to declare the July 28 Ultimatum, which directly lead to Austria-Hungary's declaration of war on Serbia and the outbreak of World War I.
But another cause was the intertwining alliances built between European powers throughout the 19th century. At the end of the Napoleonic Wars the German Confederation was established as a replacement to the Holy Roman Empire, which Napoleon had dissolved in 1806. It was dominated in the north by Prussia, and in the south by Austria, which inevitably was to end in direct conflict between the two. In 1864, the two engaged Denmark in the Second Schleswig War which won them the province of Schleswig-Holstein, which they ruled co-operatively. In 1866 they engaged in war between themselves in the Austro-Prussian War, which lasted famously seven weeks and resulted in a decisive Prussian victory, allowing them to establish the North German Confederation. Then after the later War of Nations, between Austria, France and Bavaria on one side and Prussia and Italy the other side, Germany united under Prussian King Wilhelm II and the new German Empire.
The alliance between Germany and Italy that resulted became the core of the Central Powers, which would go on to include Austria-Hungary and the Ottoman Empire in 1889 after the Treaty of Budapest. The Allied Powers or Entente was established officially in 1894 when Russia and France cemented an official alliance against Germany. In 1907, the Anglo-Russian Alliance was formed against Germany as well as the United Kingdom had become concerned with the rapid naval growth of Germany's High Seas Fleet which would appear to be trying to challenge the British Royal Navy. It was these alliances that would turn this into a world war, but it was the nationalist fervor and technology of the war that would incur such heavy casualties combined with old tactics. The Germans were drawn into the war by Austria-Hungary, Russia by Serbia, Britain in protecting Belgium, France by Russia, and eventually Italy by Germany. Eventually all of Europe and the Middle East was drawn into the "war to end all wars," and only weak and non-aligned nations like Spain and the Scandinavians were not drawn in. But regardless of any formal plan of attack the war would soon be fought on a scale and in a magnitude that no military planner could foresee.
Western Front
1914
The Western Front opened in Europe on August 4, 1914 well over a month into the war, when the Germans enacted their Schlieffen Plan, developed by Count Alfred von Schlieffen as a way for Germany to easily conquer the French via Belgium and then moving all of their forces East to fight Russia in the case of a two-front war. The plan was enacted as originally devised with a German invasion of Belgium on August 4, coming two days after the Germans invaded and conquered the small nation of Luxembourg. The German invasion plan required that Belgium's neutrality be broken by the German Army in order to attack the French on their left flank. Thus the German invasion of Belgium went ahead as planned, but the Belgian resistance was underestimated by the Germans, and the Germans were held at bay in Germany for one month before they could enter France en force. Belgian forts like Liege, Namur, and those at Antwerp were blown to pieces by the German "Big Bertha" heavy artillery guns, allowing the Germans sweep through the country, leaving only the city of Ypres unconquered by the Germans by October 10, 1914.
Meanwhile, further to the south in the Alsace-Lorraine region, the French Army went on the offensive in mid-August, enacting their own battle plan, Plan XVII. The French Army moved into the German province, with five objectives to achieve, but by August 25, 1914, the French had been beaten back by the Germans after suffering significant losses in the offensive, forcing them to retreat from the province. To go along with this early German success in the war, the Germans besieged Antwerp with the assistance of Austro-Hungarian soldiers from September 28-October 10, 1914, capturing the Belgian capital, and requiring 30,000 Belgian soldiers, one-third of the Belgian Army, to retreat to the Netherlands to the north, which the Germans had not invaded. Success in the war seemed certain for the Germans, and as they steamrolled in France the French Army and British Expeditionary Force retreated to the River Marne in what became known as the Great Retreat.
Then in September came the Miracle at the Marne, the British and French Armies, numbering at just over one-million soldiers, defended the river and Paris itself from a German force of 1,485,000 soldiers. After one German commander, General Alexander von Kluck, divided up part of his force to meet a potential threat to his right flank, Allied air reconnaissance was able to pick up on this gap in the German lines, and attacked, driving a wedge in the German lines. The German Army was close to enveloping the French Sixth Army, but with the assistance of reservists and taxi cars they held out against the Germans, and the German Second Army was then devastated in a night attack by General Franchet d'Esperey and his Fifth Army. The German First and Second Armies looked like they would be surrounded and destroyed, which caused German commander, Helmuth von Moltke the Younger, to suffer a nervous breakdown, requiring his generals to coordinate a retreat. The retreating German Army was pursued by the Allies, but they only captured as much as 12 miles (19 km) in a single day, and the Germans successfully withdrew 40 miles northeast to the Aisne River. Afterward both sides dug into their trenches, beginning the trench warfare that would plague both armies throughout the war.
Shortly afterwards the Germans moved in to capture their only unaccomplished objective in Belgium, the western town of Ypres. After the Allies failed to break the German lines at the Battle of Aisne in late September 1914, the Germans moved in to captured Ypres, the remainder of the Belgian coast, and to move in to capture the French Calais region and the ports from which the British were crossing the Channel into. Their maximum objectives were to capture Dunkirk and Calais, but the Germans and Allies knew that Ypres had to be captured first. The Germans flung 5.4 million soldiers to capture the city and the remainder of the Flanders region of Belgium, attack the Allies on their northern flank. German improvements in reconnaissance gave them the advantage in the battle, allowing them to estimate the amount of force the Allies were throwing into the defense, the German offensive action began on October 19 and ended on November 24, at which point the Belgian and Allied forces defending the city surrendered, and the Allies retreated back into France. The city of Ypres was conquered, and the remainder of Belgium was knocked out, requiring King Albert I of Belgium to take what was left of his army and retreat into France.
The Race to the Sea was less successful from that point on as the French and British, having also lost the Battle of Nieuport to the north of Ypres, no longer worried about defending the Belgian coast, which was now all but lost. The Germans moved in to capture Dunkirk and the Calais region, but were then stopped at the Battle of Lille in which the French held their lines allowing them to force a stalemate in the offensive, and eventually by the end of November all mobile movement along the front had ceased and Calais and Dunkirk remained in Allied hands, keeping British supply lines open. Both sides then set themselves up for a long defensive battle, which only broke at Christmas. On Christmas Day, 1914, soldiers from sides met in No-Man's-Land, the land between two trenches, and celebrated with exchanges in gifts like boxes of cigarettes, alcoholic drinks, and even souvenirs from home. Although it was a nice break in the harsh fighting, both sides would not celebrate Christmas along the front again until the war finally ended in 1918.
1915
The opening of the new year in 1915 was met with anything but joy on the Western Front, but as the Allies began to outnumber their German counterparts, a breakthrough appeared to be on the horizon. In the past four months of fighting Germany had gained control of all of Belgium and trenches now lay across every mile from the Swiss border through France. The year opened with an Allied offensive on the German-occupied city of Champagne-Ardenne, which only resulted in a stalemate, but set the stage for the rest of the year as both sides incurred high casualties of around 90,000. The Allies then launched a counteroffensive into Southern Belgium in an effort to reconquer the strategic city of Ypres to open the Belgian campaign again. Eight Allied infantry divisions advanced on the city defended by seven German infantry divisions, with the Allies attacking strategic areas like St. Julien and Frezenberg in late April and early May, but then the Germans counterattacked. By officially being the first users of poison gas on the Western Front (they had already used it against the Russians on the Eastern Front), the Germans had incurred a new type of warfare, the kind with biological weapons. The Germans used chlorine gas shells, which was spread by the air and pushed towards the Allied lines, forcing greater casualties on the Allies, leaving some of them blind. After they were beat off and with poison gas used against them, the Allies retreated back to their lines, with the Germans failing to pursue them.
Then French General Philippe Petain prepared the Allied armies for another attempt at breaking the German lines at Artois. Although he had originally made some good advances, Petain's army was slowed down, and eventually pushed back, forcing another stalemate by the time that the offensive ceased on June 18 after over a month of fighting. The French Army under Joseph Joffre then launched another counterattack against the Germans in late September at the Second Battle of Champagne, which began rather successfully. The French made modest gains as their artillery pounded the German lines for three days prior to the beginning of the offensive. But the day after the offensive began, reserves arrived and the German reinforcements stopped the French advance, eventually ending the offensive on October the 6th. The attack on Champagne began again on October 30, but the initiative that the French had a month earlier was gone and they failed to make any gains, actually losing ground to a German counterattack. The French offensive battle plan for Champagne was finally ended on November 6, after the fighting neither side had advanced anywhere over a mile.
Meanwhile, further to the northwest in France, the British launched an offensive on the town of Loos, with the British Expeditionary Force being backed by reinforcements from the British Indian Empire. The British used two technologies to their advantage, using their own gas weaponry and planting mines under German lines for the offensive to exploded at zero hour. Ultimately the British flung 140 tons of chlorine gas at the Germans, but anti-gas methods, mainly early gas-masks, allowed many more Germans to survive the attacks. But the British did break through the weaker parts of the German lines, capturing the town of Loos, but German defenses geared up for a counterattack, and on September 28 the British retreated back to their lines. The Germans then launched a counterattack against the British lines on October 8, but failed to make any major gains and abandoned the offensive by nightfall due to high casualties. The British attempted a final offensive on October 13, which ended in failure due to lack of equipment, and heavy October and November rains prevented either side from launching another offensive. Ultimately, British Field Marshal Sir John French was fired as the head of the BEF as a result of the battle, as British losses had been twice the German losses, 50,000 to 25,000.
The last Allied attempt to break the German lines in 1915 came at the Third Battle of Artois, a combined Anglo-French force under the separate command of French commander Auguste Dubail and British commander John French launched an offensive to destroy the German Sixth Army under Bavarian Crown Prince Rupprecht. It was the last attempt by the Allies to exploit a numerical advantage over the Germans in 1915, but would ultimately end in failure. Originally meant to be concurrent with the attack on Champagne, the goal was to capture German rail supply centers at Attigny and Douai. Beginning with a four-day artillery bombardment, and after the offensive began on September 25, the French capture the town of Souchez on September 26. But they then made little progress in their attempt to seize the town of Neuville-St Vaast, and overall the Allies failed to break the German defensive lines and could not break through the German lines.
By the end of 1915 the Allies had failed to capture any major objective and had failed to use their numbers to achieve any great breakthrough of the German lines. In December 1915 as the BEF was in ruin, Sir John French was sacked as the commander of the force and was replaced by Field Marshal Douglas Haig. The Germans spent the winter of 1915 repairing their defenses and replacing their losses with new reservists, preparing for the up-and-coming action that was to take place in 1916.
1916
After the long stalemate of 1915, which not only introduced poison gas to the Western front, but ended with little-to-no gains being made by any fighting power, the combatants were ready to use whatever means necessary to achieve a breakthrough. German General Erich von Falkenhayn wanted a way to bleed the French dry, to attack an objective the French would blindly defend, and force them to suffer massive casualties in its defense. After the sieges of Liege and Namur, the French had seen that heavily fortified redoubts were defenseless against German heavy artillery guns, and so throughout 1915 the French depleted Verdun of 50 batteries and 128,000 rounds of artillery ammunition to be moved to the offensive to the north. As this process was still going on at the end of January 1916, the Germans selected Verdun, also a strategic railway location, as the target for Falkenhayn's "bleed them dry" offensive. The fact that it was surrounded on three sides by the German Army and had only one major supply line to the French Army was only icing on the cake.
The German Army moved in on Verdun on February 12, 1916 and began with a ten-hour artillery barrage that dropped 1,000,000 shells on the Verdun fortifications. This was followed by an attack by three German Army Corps on Verdun who used flamethrowers and storm troops to rid the area of what their artillery had not. Within 10 days the Germans had advanced 3.1 miles (5 km) into the Verdun sector, and it was only then that due to failure in the French communications did the upper command of the French Army realize the magnitude by which the Germans are attacking Verdun. The French then tried to mount a counterattack on February 23, only allowing the Germans to launch their own counterattack and capture the town of Bois de l'Herbebois. By the next day, February 24, German forces had reached the center of the French fortifications, Fort Douaumont. A raiding party lead by Captain Hans Joachim Haupt and Second Lieutenant Cordt von Bradis made up of 19 officers and 79 soldiers lead a successful raid, for which Haupt and von Bradis were awarded, which captured the fort.
Soon after, Philippe Petain took control of the Verdun sector command and reinforced it with the French Second Army. Petain ordered more defenses to be built-up within the center of the fortifications to allow for a better defense of the area. Eventually by the end of February the German offensive had slowed down after the Germans take the town of Douaumont, allowing the French to trickle in 90,000 soldiers into Verdun and 21,000 tons of ammunition to their artillery. The Voie Sacree (Sacred Way) allows the French to continue a steady flow in the defense of Verdun, but the Germans are reinforced in mid-March by two more army divisions, keeping the balance of power. In late March, the French launched a counterattack on Douaumont, which was preceded by a moderate artillery barrage, but ultimately the defense of the town was a German victory and the French lost four infantry regiments in the attack. As early April came around, the reinforced Germans stormed and captured both the Bois des Corbeaux and the Le Mort Homme. The French had lost crippling casualties defending these positions, and the Germans are certain their "bleed them dry" strategy is working.
After the Germans capture Cote 304 soon after the fall of Le Mort Homme, the French launch another counterattack on Douaumont in May, but again fail with high casualties. In late May the Germans launch a maneuver to cut the French off from behind, and to finally close their supply lines. The massive assault uses four divisions of infantry and is launched after a 12-hour artillery barrage, but the French, knowing their dire position, put more infantry on their rear to defend from the German attack. The Germans make good gains against French reinforcements, and the French begin to rush to put as much supplies around Verdun as they can before they are cut off. The Germans break the French defenses and the French city of Verdun is cut off from ground supply lines on May 21, 1916. The French then prepare to begin dropping in supplies by air, a strategy that had never been tried before, but decide to turn down this strategy by declaring it too risky. Instead the French decide to prepare for a counter-offensive around Verdun using reserves that have been defending the border with Italy in the case of the latter's attack.
As June rolls around, the Germans prepare for a renewed offensive on the French rear, and in anticipation for this offensive they reinforce their Army with 150,000 new soldiers to the front, preparing to combine storm troops, heavy artillery, and high numbers to overwhelm and obliterate the French defenses. The offensive begins on June 6, beginning by firing 116,000 gas shells at the French lines, claiming 1,600 French lives. The Germans first moved in on the flanks of the French rear, attacking the town of Dieue on the French right flank and the town of Montzeville on their left flank. The German offensive rolls over the French defenses and German soldiers prepare no longer for a frontal assault on Verdun, but now rather a rear attack. German soldiers press on the French flanks, and Petain, realizing this may be the decisive fight for Verdun, declaring to his soldiers "Ils ne passeront pas!" (They shall not pass) But the Germans continued to fight despite the French commander's words, and as the German pincirs met up at the roads where the Sacred Way had once lead to the city of Verdun.
After the offensive ended at the end of June, the Germans had failed to totally knock out the remaining French defenses, but had made considerable gains, leaving at most 7 miles between the lines by the beginning of July. Then in the dense July heat, the French launched a massive counterattack, including an entire French Army with which to either break the German lines and force a retreat, or the more likely event of breaking through to Verdun, allowing the remaining French troops to withdraw, and then retreating before the Germans could attack again. The offensive later turned into a complete debacle as the French failed to gain more than a mile of territory by the end of July, a German counterattack ultimately forces their defeat and French inside Verdun grow hopeless of victory. Thus in August of 1917 the final German attack blasts into Verdun, and at last the city falls to the German Army, and Germans win their "bleed them dry" victory. The Germans have lost 305,000 soldiers in the battle, while the French have lost over 670,000 soldiers, dead, wounded, and few captured, in the fight.
Meanwhile the British have launched their own offensive against the German Army farther north along the Somme River. As their French comrades moved towards defeat in the Verdun sector, the British launch the Somme Offensive on the Germans on July 1, 1916. Douglas Haig, the new commander of the British Expeditionary Force, made it to be the British effort in a combined Allied offensive on both the Western and Eastern Fronts to break the German lines. The Allied plan was revised after the Battle of Verdun opened on February 1, 1916 as the French no longer were able to put a great force into the battle, but still made a significant contribution. The British offensive began when the British set-off 40,000 lbs of mines beneath the German-controlled Hawthorn Ridge Redoubt. After the shattering sound of this offensive was made, thirteen entire British divisions launched the beginning of their offensive.
After communication failures occurred the battle eventually advance began to turn into a complete failure, which required the use of British Commonwealth reserve units. But as these foreign soldiers marched into battle, they were cut down by German machine-gun fire. Famously the Tyneside Irish Brigade Regiment marches against German lines in full view of their machine-guns and is entirely cut down. The only assets to the British attack were surprise and numbers, allowing them to make slight gains against the Germans. But still then the British advances were very minimal and Douglas Haig pondered the idea of ceasing the attack and launching an offensive elsewhere. But as he decided to continue the attack at the Somme, the British continued to lose casualties, eventually losing around 60,000 total casualties in one day. July 1st was to become known as the "bloodiest day in the history of the British Army."
Throughout the next two weeks, the British and French continued to push their offensive against the Germans along the Somme River. Although the German General Staff had been set off-guard by the surprise offensive, Falkenhayn pushed to make sure the Allies did not break through. As the Germans had not planned on being on the defensive at any great extent in 1916, Colonel Fritz von Lossberg saw it as the perfect time to enact a new "defense in depth" strategy. German reserves would be held behind the front in defensive lines, while lighter amounts of soldiers would be placed on the front and this would ensure less casualties. The British had failed to make any great gains on the first day as they had hoped, but Haig saw modest gains being made in the South, and so saw to it that they focused there in the coming days. By July 3rd, the Allies had succeeded in partially capturing towns in the north, but witnessed greater success in the south. By July 14, 1916 the German's southern flank was hard-pressed while the British were held down in multiple forests to the north. Within just two weeks of fighting, with tens-of-thousands of deaths, the Allies had only gained six miles in their advance.
The British then planned for a breakthrough attack in the north at Bazentine Ridge, and after a lull in the fighting between July 11 and July 14, that is where they attacked. The British objective was to capture the towns of Bazentine le Petit and Bazentine le Grand, and the German objective was to make a decisive defense which could force the British into retreating by mounting casualties. The British won early success by launching a creeping barrage of artillery, which covered the British advance right up until they reached the German trenches. The British had managed then to punch a gap in the German lines, but then they failed to exploit it, and this was then followed by a failed cavalry charge. But here the Germans had the advantage due to "defense in depth," forcing on the British enough casualties that they did retreat, and were then followed for a short while by a German counterattack. The German counterattack in the north then pushed the Allies back to their lines held on July 14, meaning the Allies had totally failed.
The British then launched an offensive on the town of Pozieres, again the British were looking for a breakthrough to occur in the north. The British called on the power of their Anzac Corps, using soldiers of the Australian Divisions to launch the offensive. Beginning on July 23 at night, the offensive was also an early success after Major General Harold Walker had asked for emphasis on preparation and bombardment before the offensive. Although their first objective was achieved, the attempt to capture the German's second line had failed, and sat through three other British attacks until August 3. Then the Germans launched their own counterattack on the British, pushing them back again their original positions, further frustrating the British High Command. Then at last on August 5, the British made one final massive push on Mouquet Farm near Pozieres, but after another month of fighting for the territory with the Germans, the British were again forced to retreat.
The remaining month-and-a-half of fighting between the Allies and Germans was marred by attrition on both sides, and eventually later on by a British break-down in organization. In early September the British had launched two indecisive attacks on the towns of Guillemont and Ginchy, and much of the remainder of the time was fighting in the forests that dotted the German northern flank. In late September, the British, in need of a breakthrough, deployed two "tanks" in offensive actions against the Germans. Although they proved to be very big on scaring the Germans, they both had broken down on the same day they were deployed. Eventually a November chill set in and British finally gave up on breaking the German lines. The Allies had thrown 1.2 million soldiers against the Germans in an offensive that had cost the Allies 630,000 casualties, to German losses of 425,000. It was suggested by the German command to the General Staff that they retreat back to the Hindenburg Line defenses, prepared 40 miles (64 km) east, but the Germans decided to reinforce their lines instead, believing correctly that the British would not attempt such an attack again for quite some time.
The Germans had succeeded in forcing massive casualties on the French and British Armies in 1916, far greater then the Allies had on them. The French had made a dire mistake in moving soldiers from the border with Italy in the failed Verdun counter-offensive. Soon after in February 1917, the Italians joined the fight on the Western Front, and the British and French were forced to move roughly 600,000 reserve forces south from the fight with the Germans now to hold off their new enemy to the south.
1917
As the year opened, the Italian Army invaded France, beginning with a force of roughly 1.2 million that wasted no time after launching their invasion in mid-March, 1917. The first couple major objectives captured Monte Carlo, Monaco, and Nice, which quickly turned the invasion into a high priority for the defense of France. Now 800,000 Allied soldiers had to be moved to assist 250,000 French soldiers already on the border in reserve to hold off a possible Italian attack. By the middle of April the Italians had reached as far in as Toulon, but came just short of that objective, and their overall objective of Marseille. The Allies were supported by soldiers from Portugal who were vital in containing the Italian assault, but now the Allies were fighting a war of attrition on two fronts. The offensive was contained by the beginning of May and support of Portugal was the decisive force in this, allowing for the Allies to keep up to 200,000 soldiers on the Northern front.
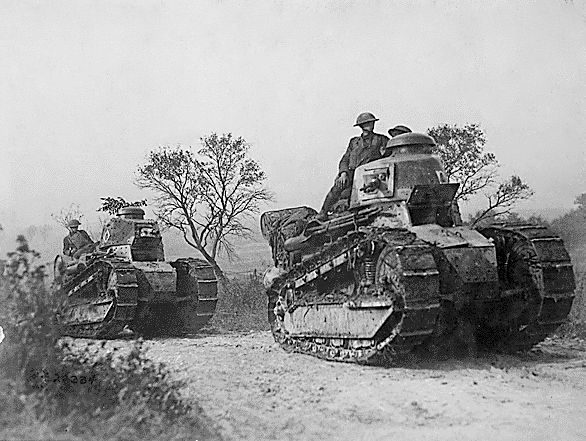
Those soldiers became vital on April 9, as it was on that day that the Allies launched their latest counterattack on the German lines at Arras. The British launched the attack as a broad frontal assault between the cities of Vimy and Bullecourt, preparing the German lines for attack first with the usual massive artillery assault. Then Canadian forces marched out to capture the strategic point of Vimy Ridge, while British forces pushed on to the Scarpe River. But while the British made significant gains on Vimy Ridge, the British and Canadians were frustrated by repeated and failed attempts to break the German lines with their defense in depth. While the British were able to capture the Scarpe River by April 14, the Germans succeeded in forcing the British to stretch their communication lines. The last part of the British offensive was against Bullecourt, in which two whole divisions took place, one British, one Canadian. This was also a notable use by the British of tanks, 11 of which were deployed for use at Bullecourt. The tanks were delayed by weather on the 10th of April, but the British used them in their attack on the 11th. But German defenses managed to hold off the British attack, even with their tanks, two of which they then captured, studied, and used in battle with the German Iron Cross painted on the sides.
The British launched the second phase of the battle on April 23, launching a second offensive on the Scarpe River towards Vis-en-Artois. Although Commonwealth forces did capture the town of Guemappe, but suffered heavy casualties when they tried to push to Vis-en-Artois. The Germans then counterattacked and were able to push the British back, eventually slowing down after the British were reinforced. Eventually any further British attack on the Scarpe was called off on the 24th of April. The British then launched on April 28, the Battle of Arleux, hoping to secure their south-eastern flank, but again failed to do so, allowing for a German counterattack. The Germans then launched their main counterattack on the British gains, making Bullecourt their first priority. The Germans took two weeks to take back the town, but eventually when the British retreated from it on May 17, the Germans believed they had achieved a breakthrough. A massed German counterattack succeeded in taking two miles of British-controlled territory by the time the offensive was stalled by British reinforcements on the 29th of May.
The French then launched their own offensive on the German lines, aimed towards capturing an 80 kilometer long ridge, occupied by the Germans who used the quarries that protected them from French artillery. While the British and Canadians were busy attacking German lines at Arras, on April 16 the French threw 19 divisions at the German lines along the 80 km ridge between Soissons and Reims. The French used a strong artillery barrage to precede their attack, but as the Germans were able to once more hide in their quarries, the attack was to no avail. As they had been warned of the attack by the French artillery, they were able to concentrate their machine guns on high ground, overlooking the valley of the Aisne River. The German 7th Army was left to defend the valley, and on the first day of fighting did well at doing so as the French lost 40,000 men in all casualties to the Germans along with 150 tanks. Their attempts at using a creeping barrage were poorly executed and failed to cover the French advance as they moved towards the German lines.
The French then launched a second assault on the 17th, with the French Fourth Army making the push against the German First Army east of Reims towards the town of Mornvilliers. But even as the Germans easily repelled the assault, the French continued their attacks towards the Aisne River continued until the 20th of April. Some small gains were made to the west of Soissons, however, the attacks were continuously scaled back and the Germans were soon able to retake their losses. Eventually the French had gained only 4 km in the whole attack, but at the loss of 120,000 French soldiers to the German losses of 40,000. The attack had been a failure, but seeing as their attack towards Aisne and Arras had failed, the Allies against looked towards Ypres for their breakthrough attack.
The Third Battle of Ypres began on June 7 with the Allied attack on Messines, which held a ridge that created a massive ridge that made the natural defense of Ypres. The British began the battle of Messines by detonating 19 mines underneath German lines, which gave them not only surprise, but also a gap in German lines to attack through. Artillery fire, which had ceased at the point the mines were blown up, then continued again to keep the infantry protected with a creeping barrage. British and ANZAC troops advanced on Messines on three sides, overrunning German positions all over Messines, and forcing the Germans to surrender in droves. Five kilometers north, Scottish soldiers moved in towards the center of Messines, facing serious defenses along the Ypres-Comines canal, which itself was eventually captured. On June 11, the British were stopped just short of their second objectives, and the Germans launched a wide-ranging, but futile, counterattack. On June 14, the Battle of Messines ended, and the Allies moved in to again attack Ypres.
The Third Battle of Ypres began on July 31, launching attacks on Pilckem Ridge, the Allies besieged the ridge, throwing masses of artillery against the area. Eventually that too fell to the Allied advance, and by August 10, the city of Ypres was under direct fire from the Allied assault. Allied soldiers destroyed German forces at numerous battles along Ypres' defenses, but eventually their advance came to the town of Passchendaele. The British threw in five divisions, backed by three Australian divisions and 11 New Zealand divisions, launched the attack on October 12. The ground on which they advanced was horrid as the Commonwealth soldiers advanced, as bodies were left there after suffering from German sniper fire. Bad weather had made it muddy and wet, and the British had a hard time getting their artillery into position. Eventually the assault on Passchendaele turned into a quagmire, the Australians and New Zealand troops were unsuccessful in reaching their objectives and the advance eventually stopped. The Germans saw a chance to strike, and 60,000 German soldiers were brought in to support 35,000 front line soldiers for a renewed counter-offensive. Eventually the Second Battle of Passchendaele was a strong German victory, pushing the British back and capturing tens-of-thousands of Allied soldiers.
Eventually supported by 6 more divisions, the German offensive pushed at the over-extended Allied flanks, crushing them with artillery and requiring Douglas Haig to order the British to retreat on October 23. The Germans launched a general offensive, hoping to achieve a breakthrough by constantly pursuing the Allies as they retreated. Soon after, the British had retreated and a final German push knocked them out of Belgium, now once and for all. As October turned into November, the Germans advance stalled and ceased by around November 6, leaving the German General Staff disappointed but satisfied that they had dealt the Allies another decisive blow. Overall the Allied casualties were 400,000 killed or wounded, with 120,000 captured to German losses of 300,000 of all kinds.
But although the Allies had been defeated by the Germans, they had one more offensive action planned for the city of Cambrai. The British attack on Cambrai began on November 20, which began with a massive barrage by over 1,000 guns on German defenses along their lines. The British creeping barrage covered their soldiers for the first 300 yards ahead of their advance, but the advantage was now held by the Germans, who had anticipated the attack with superior intelligence. The battle opened with an attack by six entire infantry divisions backed up by 437 tanks, advancing five miles into the German lines. Eventually British tanks advanced beyond their infantry, and were then torn to bits by powerful and accurate German artillery, who had grown now adept to use anti-tank shells. Eventually destruction and breakdowns piled up and the British tanks advance stalled, waiting for the infantry to catch up. As the British swept through towns like Havrincourt and Graincourt, they reached the maximum of their advance. 180 tanks were out of action at the end of the first day, with only 65 being destroyed and 115 having broken down. The British infantry losses were light for the first few days as the tank battalions suffered the majority of the casualties.
Final British efforts reached out at Bourlon Ridge, but soon after the Germans sent in reinforcements and fighting began again on the 22nd after slowing down on the 21st. After the British infantry rushed to meet up to the advance of their tanks, they were setting themselves up for disaster. Their salient was exposed to German artillery fire, and they made few advances as the 23rd and 24th of November rolled around. The British began to suffer about 4,000 casualties a day, but the British now held a salient 11 km by 9.5 km by the time the offensive stopped on November 28.
But as the British stalled, the Germans geared up for a counterattack as reinforcements were rushed to the front. Twenty divisions of the British Commonwealth Army now law within the salient, the German thought that if a successful breach of the salient could be achieved, the British divisions would be exposed and defeated. The Germans prepared for a short, but precise and rapid, artillery assault on the British lines and following this up with a rapid assault of General Hutier's Storm trooper tactics. The storm troops attacked the British salient on its flanks at Havrincourt and Gonnelieu, they made quick advances by attack in groups as opposed to waves and bypassed strong enemy opposition. The German advance was swift and in their sweep through the British lines, capturing the commanders of the 12th and 29th British Divisions. The advance that followed enveloped the 12th and 29th Divisions, resulting in many British soldiers being captured and the British rear being cut off. The German advance spread broadly across eight miles, and the German General Staff was excited to learn that it had come close to capturing the historical and strategic town of Metz. Eventually only nightfall would stop the German advance, and while much of 12th and 29th Division was captured, the remaining divisions were able to retreat south. By December 3, the pressure of Germany's advance had successfully pushed the British beyond St. Quentin Canal. 75,000 British soldiers were killed in the battle, 25,000 were captured, while roughly 45,000 German casualties of all kinds were suffered.
1917 had given both sides valuable lessons, the British and French ceased offensive operation after the loss at Cambrai, but the Germans had learned even more. Cambrai had shown the Germans the power of their short and rapid artillery barrages, the strength of storm troops, and especially the capabilities of tanks. But before the Germans were ready to deploy their own tanks, they had to prepare their soldiers not only in the ways of battling in tanks but in maintaining them. The Germans meanwhile were now preparing for a massive offensive in the spring of 1918, using their combined force of tanks, air power, and especially reinforcements as they rapidly moved German soldiers from the Eastern Front to the Western Front as Russia collapsed to Soviet revolution. The Germans turned their efforts over the winter to creating tanks and transporting troops, little did either side know that next year the war would be over soon.
1918
On January 6, 1918, the Netherlands entered the war, as the British had hoped that when they could gather their forces up enough to push for a new offensive on the Germans, that having the Dutch to launch a pinsir movement on German-occupied Belgium would prove a decisive force by which they would then be able to force Germany into an armistice. Little did the British or Dutch know that the Germans were themselves preparing for a massed offensive across Northern France, whose goal was to push the Allies into one great defeat, and force the French to surrender. The Germans were prepared to use combined arms tactics, using a combination of co-ordinated assaults with air power, infantry, and tanks in one big offensive. They moved fifty divisions within Germany's borders from the Eastern Front to the Western Front in preparation for the attack. The Germans had been fighting a war of attrition for years, now they were ready to strike a decisive blow.
German A8V tanks rolling in line to prepare for the Spring Offensive.
The introduction of the Netherlands into the war in early 1918 had been unexpected was not inconvenient, the German General Staff, some still serving since the Dutch-German War, were happy to see all of Germany's enemies in Western Europe defeated in this offensive. Two field armies were prepared to strike into the Netherlands, this time from north and south rather than east and north as had been done thirty years earlier. The Germans had also at this point been drawing up the terms of a treaty to be signed after the war ended, and prepared to make the Netherlands into a client state along with Belgium. The German Armoured Battalions were equipped with two new tanks, the A7V and A8V, to be at the helm of this offensive. The Deutsche Luftstreitkrafte (German Air Force) had become adept to their fighting air tactics with planes like the Fokker D.VII and Albatross D.III, and using bomber and ground attack aircraft like Gotha G.V and AEG G.IV.
The Allies had tried to prepare for a likely German offensive in 1918 by employing the defense in depth concept to their own lines to a degree. Their front line was defended by snipers, patrols, and machine-guns posts meant to slow down or stop any infantry assault. Behind this Allied soldiers were held in the "battle zone" where they would be forming the majority of their resistance, behind the front line, and hopefully out of the range of the German artillery fire. Defenses were widely unprepared in this concept, however, with some areas being very lightly adapted to the new defense tactics. Germany began moving its soldiers into place in late January, mid-February for the most part, prepared to break into northern France, seize Paris, force the French into surrendering, while also invading and overwhelming Allied defenses in the Netherlands, forcing them to surrender quickly and avoiding another lengthy invasion. Although the German offensive action against Britain was still in the planning stages, the Germans also hoped that if France was defeated rapidly enough that the British may then sue for peace as well. By March 20, all of the German forces were in place for the offensive, all they waited for now was the final order to go "over the top."
Operation Michael, as the Germans had codenamed it, began on March 21, 1918 with the German Army crossing the St. Quentin Canal along their front lines. The German guns hit British positions about 4-6 kilometers out and at around 4:35 they began their heavy barrage along a front of 40 miles (64 km). Mortars, mustard and chlorine gas, tear gas, and smoke canisters were fired across the British front line, a total of 1.1 million shells in the span of five hours hitting an area of 150 sq miles. The British suffered 7,500 casualties along their front lines in the biggest barrage of the war, and as they had been anticipating an attack for a while, the massive bombardment was the greatest surprise. After the Germans finally crossed over the St. Quentin Canal, they pressed the defenses of the British Third and Fifth Army, forcing the British to retreat. To the north, the Flesquieres salient, defended by the 63rd Royal Naval Division, was broken and smashed back, and the Germans pushed the British back by weight of power and numbers.
By the second day of fighting, British troops across the front were in retreat, while maintaining a fight in whatever regions they could. As disaster loomed and the British Army retreated to meet up with reinforcements to the west only small pockets of British and Canadian soldiers were left along the lines to fight the German onslaught. While many British maintained a fighting retreat, some corps of soldiers had begun to fall back to as far back as the Somme River. Eventually on the 22nd the Germans had succeeded in separating the Third and Fifth Armies, against Haig's orders that they were to keep in direct contact with the rear lines at whatever cost necessary. The Germans then moved in to crush the Third and Fifth Armies, who, facing encirclement and imminent, surrendered en masse on March 25. The Allied armies, facing defeat, now retreated back to the Somme River, several miles behind the front line.
The Allies, as they fell back to the Somme River in the west, also faced defeat to the south as German soldiers pushed to break the Allied lines and hurl at their first major objective, Compiegne. German tanks moved in an armored salient, supporting infantry, and having their path paved out by a creeping barrage that moved them steadily towards their objectives. Their other main objective was at Amien, if Amien could be captured then the British and French Armies would be divided, but first they had to break the British defenses at Alberts. The town of Alberts was defended along its lines by only three British divisions, but they put up a strong defense against the two German Army Corps that they had coming their way. The Germans assault on Albert began on March 28, and with another successful maneuver of creeping barrage, combined with tanks and infantry, the Germans swept into Albert. Within four days of fighting the British had withdrawn from Alberts after suffering high casualties and the Germans captured the town.
Meanwhile, two German armies moved south to Compiegne and the battle over the city is primarily recognized to have begun on March 30. The Germans pushed into the city, with three tank battalions at the helm of the offensive, and three corps of infantry in support of them. Germany's rapid artillery assault proved to be a major force in the battle, as they assaulted the Allied lines with almost 4,000 guns to precede the assault. After the bombardment ceased a series of gas shells were dropped along the Allied lines, which coupled into heavy Allied casualties as the British had been ordered to mass up in their front trench line for defense against the German's main assault. After the gas lifted, the German Sturmtruppen divisions began their attack on Allied defenses, which had become spread thin. The attack opened up a 40 km-wide gap in Allied lines, using their tanks to exploit the breakthrough, and then smashing through eight Allied divisions in the process. At the end of the battle on April 6, the Germans registered 50,000 captured Allied soldiers, 800 captured Allied field guns, and a wide gap opened by the German tanks which the infantry could now exploit. The Germans were now just 40 miles from the outskirts of Paris.
As Compiegne fell, the German offensive began to engulf the the remainder of the River Somme in one last final sweep to take Amiens. After reinforcement the city was defended by six Commonwealth divisions, but was being attacked by ten German divisions, with four in reserve, supported by around 243 tanks. The final plan to begin the offensive revolved around the use of 800 German field guns in their rapid artillery assault on Amiens. Like many of the fields of France, Amiens was left a brown mess destroyed by the horrors of war, but it was here the Germans would have their finest hour. The German offensive was covered in the early morning by a dense fog that lay over the town, providing the cover for a frontal movement of 72 tanks and two divisions. The first German push captured 4000 yards (3,700 meters) of territory ahead of the German lines, and after reaching these objective three more German divisions moved forward under the shield of a creeping barrage. The British desperation was shown in one final attempt to break the German infantry lines with a cavalry charged, which was only mired by the fog. Although the cavalry did reach deep into German holdings in some places, machine gun fire quickly did away with it.
After a six-hour assault the Germans had reached as far in as three miles into British territory, so surprising in some sectors that British officers were captured while eating breakfast. By the end of the day a 15 km gap existed in the British lines, with 13,000 British and Commonwealth soldiers having been taken prisoner. A further 3,500 French were captured in the assault while the German losses remained at only 8,000 in all types. The Germans had lost about two dozen tanks in the assault, but these new weapons of war were seen as having been irrelevant losses. Amiens was captured and five British divisions were lost in the subsequent week-long assault the Germans made to the English Channel. The Germans had finally cut the British and French lines in half, and some German soldiers, exhausted, collapsed at the site of the waters of the Channel. The day was called the "darkest day in the British Army," and it would soon only get darker as the British struggled to find a reason to continue to fight.
In their final push for Paris, 52 German divisions were brought up to the front line on April 25, prepared to strike the decisive blow to end the war. Twenty-three of the divisions attacked the French Fourth Army east of Chantilly, set there to defend in the case of a German breakthrough. Alongside this, the German Seventh and Ninth Armies attack the French stationed to Chantilly's west, as the German commander Ludendorff had wanted to split the French lines in two. The Germans fired their guns for thirteen straight hours, and under the cover of this gunfire the German Sturmtruppen crossed the banks of the River Oisne, preparing for their decisive blow to the French Fourth Army. Eventually the Germans moved three divisions around the Oisne River to attack the French from behind, and the were then supported by the German's main offensive, which slowly, but surely, enveloped the French. Although the French fought valiantly, even being supported by 225 French bombers, who, in a useless effort, risked German controlled skies to bomb the bridges the Germans were using to cross the Oisne, the German captured Chantilly on the morning of April 26. In the end 85,000 French soldiers of the French Fourth Army and their supporting units surrendered after the battle, knocking the entire field army out of the war.
At last having reached their final objective, Paris was now in the German's sights, but then the Germans purposely stalled. They awaited as 15 more German divisions moved up from the reserves to the front line between April 27 and May 4, allowing the French in Paris some time to ready themselves for the coming offense. The German besieged the city beginning on May 5, 1918, surrounding it with 60 Divisions, supported by 700 heavy siege guns and 1,000 field guns. German air power dropped bombs night-and-day on the French lines and in Paris itself in preparation for a main German assault. The German's cut the city's railroads off to ensure that no reinforcements would reach the city and Paris' supply lines were cut, forcing the city to eat what the citizens had within its borders. The Germans had been at the gates of Paris in 1870, and then they had simply starved the city out and defeated multiple break-out attempts. But now the Germans wanted to see the city fall by direct attack, and the German's began their first assault on the city on May 10, 1918.
The Germans decided to best way to do so was in massive waves along the massed Parisian defenses, supported by tanks and air power. The first of such assaults was relatively successful, but at the loss of 5,000 soldiers the Germans had gained just about 1,000 yards, less than a mile, but the city of Paris was still defended by a series of fortresses and redoubts that surrounded its outskirts. The French defenses were centered around the south-east of the city, while the French position much more dense forces of infantry and machine-guns to the north-west where the Seine River flowed, only guarded by one redoubt. But as the Germans had learned how to use heavy artillery to their advantage against French redoubts ar Verdun and Belgian ones at Liege, the Germans decided to attack towards to the south-east. The Germans began to attack the redoubts, one-by-one, on May 20, seizing three redoubts within three days, and opening a gap in the French defenses. But these forts were the second ring of defense around Paris, ones that wee twenty kilometers from Paris itself, they still had more, but older forts, to destroy.
German artillery at that point had only two major forts to break on Paris' southwest side, just 5 kilometers out from the city. The Germans send Sturmtruppen units to raid and take the forts, while Fort Charenton fell rather easily to the German assault, Fort Nogent was a tougher nut to crack. German soldiers failed in a single assault to take the city, but support from German Paris-long range guns made a second assault possible and the fort fell to that attack. A German assault on the line of defense between these two forts required 12 divisions to break, but when it did, Paris was left hopeless. News came to the German command that Paris' defenses had been breached, and Germany sent 10 more divisions into the city to support the original 12 divisions, which pushed to seize the War Ministry, the seats of the French Parliament, and the Eiffel Tower, the symbol of French Republicanism. The French Army was forced to withdraw into the city in order to defend it, opening the door for a massive German onslaught. Two entire field armies attacked the city, finding only modest resistance as the French had retreated to surround the German divisions in the city. As they themselves were surrounded by German soldiers, Erich Ludendorff likened the situation of the French to situation of Caesar at the Battle of Alesia in 52 BCE.
But unlike Caesar, the French would not be breaking out, and the Germans surrounded the French Army, which had now begun to surrender in waves. The French government, besieged and hopeless, finally sued for peace with the Germans, signing the Armistice of Compiegne on June 11, leaving the French people devastated. France was forced to cease all military engagements with the Germans within six hours of the armistice, France was to immediately remove all soldiers from Paris and the Pas de Calais region for the German occupation until the end of the war, the French fleet was to not leave its ports until the war ended, and the French were to surrender all of their railroad access to the German Army. As the French collapsed, the Italians launched their own offensive from May to early June, hoping to gain more of a say in the coming treaty. The French were left with no choice but to accept the armistice, and with this German seemed to have finally reigned victorious over Western Europe, all that was left was Britain and the Netherlands.
The Netherlands was attacked when the German Spring Offensive began in March, as they had only been in the war for several months but German still had a grudge against them for their war 30 years ago. Along with this, German also envisioned the Low Countries as a buffer zone with France in the years to come. Two German Armies, roughly numbering at 450,000 soldiers, backed by 150,000 later soldiers, invaded the Netherlands on March 22, and the Dutch again put up a resistance. The Dutch Army by this point was only at 350,000, just under the 380,000 the Belgian Army had had just years before. The Germans made rapid advances throughout early-to-mid-April as the Dutch Army fell back, allowing the Germans to capture Maastricht, Arnhem, Eindhoven, and Enschede. But the British remained able, despite naval setbacks, to reinforce the Dutch with soldiers, but only about 100,000, that allowed the Dutch to hold out against the Germans into May, when the 150,000 reinforcements arrived. Then into June, as the French fell to the south, the Germans launched a renewed assault on the Dutch, seizing the cities of Rotterdam, Utrecht, and finally Amsterdam. The Dutch surrendered to the Germans on June 20, and the 80,000 British soldiers who hadn't been killed or captured retreated like their counterparts in France across the Channel to defend Britain.
The German Army quickly moved in to occupy Calais, Dunkirk, Amsterdam, and Paris, employing martial law in urban areas until the British were subdued. Superior German naval power was able to put the pressure required on Great Britain, but Ludendorff and Hindenburg also wished for an aerial campaign to reign terror on the British. The German Air Force was determined that once its air fields could be paved down that a rapid campaign of aerial bombardment on London, Bristol, and as far north as Cardiff and Oxford would compliment the naval campaign to starve Britain out. The British public knew that the war had turned against the British favor, but the British Foreign Ministry wished to simply communicate with the Germans and co-ordinate a ceasefire agreement to end British participation. The British would not admit defeat in the war, but the Germans were determined to bring upon them a crippling piece, one of their main purposes for fighting the war was to replace Britain as the premier world power. To the Germans, if Britain were to exit the war as anything less than Germany's subordinate on the world stage then that would be unacceptable.
The Germans began their combined aerial and naval offensive on Britain on August 8, 1918 as evening raids of 20 Zeppelins and 120 bomber aircraft. The German High Seas Fleet moved around the coast of the English Channel, beginning their major blockade of the British Isles. Over the next two weeks the campaign escalated and the Germans began daily night-and-day bombings of southern British cities and the blockade cut Britain off with its strangling grip from their foreign food supply. The Suez Canal was closed to British shipping after the Ottomans seized it in 1917, and by this point the British depended mostly upon food shipments from South America and those Indian ships who could make it around Africa. The United States had shifted most of its agricultural business to Austria-Hungary and the Ottomans, who now required massive shipments of food to support growing populations and to feed expanded armies. But the United States still did ship food to the British, but the Germans did not want to destroy American ships as they though if the United States entered the war it would severely prolong it. They simply blockaded the foreign shipments and forced them to turn their ships around, which angered, but did not provoke foreign nations.
The situation for the British continued to get progressively worse over the next couple of months as rationing harshened, bombings destroyed public offices, and the government of David Lloyd George seemed powerless to stop the German siege. As November opened the German Army began to argue that perhaps only a land invasion of Britain would force them to surrender, but the German General Staff and the Naval Ministry stretched the idea of not wasting any more German lives, especially in what seemed like a war that had already ended. The German Air Force requested permission to begin the bombing of national British landmarks like Westminster Abbey and Number 10 Downing Street, but the General Staff again said no, thinking that such attacks would only serve to galvanize the British populace. So at the beginning November the British Foreign Ministry accepted a communication line with the Germans, who offered them light terms: British shipping lanes would be re-opened, Britain would not be occupied, Britain would not have to have its fleet interred like the French, and the British would be allowed to keep a standing army of 100,000 in the British Isles. The British government agreed to the terms, and an armistice was agreed to on November 11, 1918, finally ending World War I.
Eastern Front
The Eastern Front of World War I began on August 17, 1914 when hostilities were opened between the German, Russian, and Austro-Hungarian Empires. This front would be unlike the Western Front as it would be almost no-where as nearly as static as the fighting in the West. Although it would not be unlike the Western Front in the end, the aftereffects in the East would be just as repercussive as its Western counterpart in the coming years. Eventually Romania would enter the war too, they themselves would only suffer the same fate as their Russian allies. It would be on the Eastern Front the Germans would have their finest moment in this part of the "War to End All Wars."
1914
The Front opened with the Russian Army going on the offensive and invading East Prussia, a historic home province of the German Empire and core part of Prussia. The opening battle of the offensive was also on August 17 at Stalluponen when the Russian First Army under General Paul of Rennenkampf continued its march to the East Prussian border. von Rennenkampf approached the German defenses around Stalluponen, but was essentially marching unopposed, but for some reason did stop his forces just five miles (8 km) from the German defenses. Then German General Hermann von Francois decided to, without orders, use his I Corps of the Eight German Army to attack a resting Russian division near his defenses. The frontal assault broke the Russian divisions light defenses and they fled eastward, losing 5,000 men and 3,000 soldiers being taken prisoner. Although Francois had then been ordered to cease his pursuit of the Russians, he communicated back that he would so "when he has defeated the Russians." The first battle on the Eastern Front was then turned into a German victory as they broke the Russian Army and began a pursuit.
German commander on the Eastern Front, General Maximilian von Prittwitz, wished to see his German Eight Army keep its defensive position in East Prussia as the Russians heavily outnumbered the Germans. But with the German's successful offensive action at Stalluponen, Francois convinced Prittwitz to launch an offensive action as the German's had better training and equipment than their Russian counterparts. As the German soldiers under Francois were mostly Prussians, and specifically East Prussian, he felt it would be demoralizing to either retreat or be on the defensive while their home fell to the Russians. Prittwitz finally agreed and was given the chance after a skirmish between German and Russian soldiers on August 19 outside the town of Gumbinnen. After this Prittwitz was convinced by Francois to launch a counterattack, and on August 20 the I Corps of the German Eight Army attacked the Russian 28th Division. The Russian artillery launched a counterattack, but quickly used up its ammunition and left the Russians at the mercy of German artillery, which later required them to retreat eight kilometers at the end of the day. German advances further to the south failed after the Russian heavy artillery defeated a German reserve division and the Russian were able to attack the German flanks.
Subsequent German retreats lead to 6,000 prisoners being taken by the Russians, the battle was a near disaster for the Germans and Prittwitz was devastated. Helmuth von Moltke the Younger, the Chief of Staff of the German Military had Prittwitz's recalled and replaced with Paul von Hindenburg. Hindenburg ordered Prittwitz's command of retreating to the Vistula river revoked, and moved to keep the German Army in East Prussia. The Russians suffered from a poor series of supply line, which caused serious problems for the Russian Second Army as it tried to advance. And Paul von Rennenkampf's First Army was delayed after Rennenkampf wanted it to regroup so it could prepare for a possible German counterattack. But the Russians still held a numerical advantage over the Germans, and as the German Eighth Army's position was standing they could not meet the numbers of even most of the Russian Second Army. But Hindenburg believed that the Germans could regain the advantage if only they could move up their reserve corps to the west.
Russian General Samsonov pushed his Army to attack the German XX Corps, which faced encirclement and between 22-24 of August was in a state of skirmish and retreat with the Russians. Samsonov's original objective was the city of Seeburg, but as his flanks were exposed when he advanced he ordered his soldiers to move to the northwest and towards the Vistula. To avoid being flanked Francois was ordered to push towards the Russians' left flank, but Francois said no and waited until August 27 when they would have artillery support. Ludendorff and his deputy, Hoffmann, traveled directly to Francois' Headquarters and ordered him to move against the Russians, which he then promptly agreed to on August 26, ordering his soldiers to charge the enemy with bayonets. Just as General Hoffmann had hoped for, the Russians continued their march to the west and Hoffman had hoped that the further advance of the Russian Second Army would intercept the recently reinforced German lines, allowing for a decisive battle to destroy the Russian Second Army. The battle to come occurred at Allenstein in East Prussia, but would later be named Tannenberg to relate it to the 1410 battle which destroyed the Teutonic Knights.
On the 26th of August, the Russian First Army began its main offensive towards Königsberg and met little resistance along the way. As they moved, they hoped to expose the Second Army's right flank and open a gap between the two armies, which was then reported on by the Russians and intercepted by the Germans. The German XVII Corps began the German attack by fighting the divided Russian VI Corps, which had been divided up into its two divisions. The Corps retreated and the right flank of the Second Russian Army was now open for the German offensive. The Russians were then blocked from a further advance to the south by the German XX Corps, but the center of the Russian advance continued unopposed. Francois lead an attack on the Russian left flank on August 27, which was defended by the Russian I Corps, in which his artillery proved decisive and the Corps was retreating by nightfall. Samsonov ordered his advancing XIII Corps to cease movement while the Russian XII and XV were trapped with the XIII corps in the Tannenberg area. By the end of August 28, the Russian I and VI Corps were retreating and the Russian Second Army's left and right flanks were left exposed.
Rennenkampf was ordered back from the advance to Königsberg to assist the trapped Second Army and the XVII Corps moved southwest to assist the Second Army. But by August 29 the Second Army was trapped and being bombarded daily by German artillery, leaving them nearly hopeless. The Russian First Army attempted to assist the trapped Second Army, but they were delayed by German cavalry. By the end of August 29, the Russian First Army's XVII and VI Corps were still 70 kilometers from the Second Russian Army and the First Army was now stretched out and scattered, leaving the entire Russian advance in a very dangerous position. By the end of August 30, the battle was over and the Second Russian Army was completely destroyed: 78,000 killed or wounded, 92,000 captured and 500 guns seized by the Germans. The First Russian Army was still in danger, however, and the Germans were ready to exploit this and finally stop the Russian invasion of East Prussia. When the news of the Second Army's destruction reached him, General Alexander Samsonov committed suicide.
The remains of the Second Russian Army were gone by September 2, and the German Army was moved to meet the Russian First Army under Rennenkampf's command. The right flank in the north was under the protection of extensive defense works outside of Königsberg, but the Germans were able to reinforce for the attack by providing two new corps to the Eight German Army. Rennenkampf moved his new forces to the northern defenses and prepared the First Army for a counter-offensive to the south. Ludendorff moved two corps to the south to defend the area around the Masurian Lakes and covered any gaps along his lines during this time. Then the 3rd Reserve Division was moved 30 miles south from Rennenkampf's lines to provide for a secure defense in the case of a Russian attack to the south. But then Ludendorff ordered his soldiers in the south to attack the Russians before they could attack him on September 7th. The Germans then pressed the defensive northern flank of the First Russian Army, bombarding them with their artillery. The Russians in the north retreated in good order, but to the south the Russian II Corps was being attacked by both the XVII and I Corps.
The Russian II Corps fell back to the south and Rennenkampf ordered his northern forces to push the German XX Corps back, which they only slightly succeeded in doing. But eventually the Russian II Corps was itself forced to fall back because otherwise it would have been surrounded by the Germans. By September 11, the Russians retreated to the north, but news was now developing in Russia's HQ that encirclement appeared possible. As Rennenkampf wished to avoid the same fate as Samsonov he ordered a retreat by the First Army to the Russian border. A strong rear guard allowed the Russian retreat to occur rapidly, but Ludendorff had succeeded in setting up a trap but news of a possible Russian counterattack stopped the Germans and their advance stalled. The Russian First Army suffered 170,000 casualties, 125,000 killed or wounded and 45,000 captured, the First and Second Russian Armies were destroyed, but General Paul von Rennenkampf managed to survive the struggle. The Russian Tenth Army waited for the retreating Russians at their border and the Germans were forced to cease their advance, but the Central Powers were not finished yet.
By August 26, the Austro-Hungarian Army and its highest commander, Chief of the General Staff Count Franz Conrad von Hötzendorf, were ready for a Central Powers offensive into Russian Poland. But as the Germans were busy fighting and destroying two Russian field armies off to the north, they were convinced otherwise and the Austro-Hungarians prepared for the Russian defeat in East Prussia before launching an offensive into Poland with Germany. By mid-September, September 13 to be exact, the Austro-Hungarians and Germans were ready, but Hötzendorf had worried that if they didn't act rapidly that Russia's numbers could be brought to bear against the Central Powers. First the Austro-Hungarians attack Krasnik, attacking with superior numbers and a better physical position. The Austro-Hungarians also possessed superior cavalry, which was on the Eastern Front a great advantage with mobile warfare. The Russian Chief of Staff, General Mikhail Alexeyev ordered the Fourth and Fifth Russian Armies to stand their ground against any Austro-Hungarian attack, dooming these two armies. The Austro-Hungarians attack on September 23, using their cavalry in a flanking attack on the Russian Fourth army and a frontal infantry assault backed by artillery to destroy the Russians. The Russian Fourth Army was demolished and many soldiers were taken prisoner, the Austro-Hungarian had begun to gain momentum.
Three days later, Moritz von Auffenberg moved the Austro-Hungarian Fourth Army, consisting of 12 infantry and three cavalry divisions, to battle to attack the Russian Fifth Army, commanded by General Pavel Plehve. The Fifth Army held a numerical advantage to the Austro-Hungarians, but his flanks were very volatile, and he thus entrusted them to the Russian Cossacks. On September 26, the Battle of Komarow opened when the Austrian Fourth Army hit the front line of the Russian Fifth Army. The Austro-Hungarian frontal assault was very successful, taking 20,000 prisoners on the first day, and was then followed by the Austro-Hungarian cavalry launching a flank attack. But when the Russian center, made of infantry, began to collapse, the Cossacks withdrew, leaving the Russian flanks wide open for an Austro-Hungarian final assault. On August 29, this final attack came and the Russian Fifth Army collapsed, 45,000 taken prisoner, 100,000 dead or wounded, the remainder had fled and the Austro-Hungarians had only suffered around 20,000 casualties in the battle. They again renewed their assault into Congress Poland on October 2, now moving deeper and deeper into Poland.
Now two Austro-Hungarian armies, the Third and Fourth Armies, moved to the east to smash the Russian Third Army, and subsequently held a numerical advantage, a strange occurrence for the Central Powers on this front. The rapid advance of the Third Army had created a gap between them and the First Army which the Russians had hoped to exploit. But the Third and Fourth Armies moved to surround the Russian Third Army at Rawa, closing the gap as the Russians tried to advance to towards to and allowing them to be enveloped. The Russian Third Army used its several hundred artillery guns to try and launch a breakout, but as their fellow armies were off to the north fighting a German assault into northern Poland, the Russian Third Army was forced to fight its own way out. By the 11th of October the Russian Third Army surrendered, realizing that it was in a hopeless situation and that they were losing too many casualties. Again another Russian Army was defeated in the south and the Austro-Hungarians continued their assault into Poland.
Meanwhile to the north, the Germans had succeeded in pushing the Russians back even further, and by late October they had reached the Vistula River and the Polish center of Warsaw. The Vistula River and Warsaw was defended by four Russian Armies, the Second, Fourth, Fifth, and Ninth, with much of the Fourth and Fifth now being replenished by conscripts. The Germans feared that if the Russians massed enough armies around the Vistula River they could launch an attack into the weak German southern lines and push into the heart of the German Empire. Three Central Power Armies moved in to attack the Vistula and make it cease to be a threat, the German Eighth and Ninth Army, and the Austro-Hungarian First Army. To open the battle the Eighth and Ninth Army fought the Russian 75th Guard Division as it attempted to stop their advance across the Vistula River. Ludendorff concentrated his forces in a double envelopment strategy to surround and capture Warsaw, along with as many people inside it as possible. As the Germans smashed the 75th Guard Divisions, they took many prisoners and moved around the Second Army. The Germans had completed their crossing of the Vistula on October 29, and the Austro-Hungarian assault into Warsaw began on the same day. The Russian Second and Fourth Armies were left to fight the three Central Powers armies around them as the Fifth and Ninth moved in to counterattack.
But a turning point came as the Austro-Hungarians launched a northward offensive aimed at cutting off the Russian supply lines to the east, forcing the Fifth and Ninth Armies to withdraw to stop them. The Russians again tried to breakout of their encirclement, but they were then defeated by the Ninth Army, leaving them trapped. Warsaw fell and the two Russian Armies were captured on November 12, leaving the Russian defense of Poland in shambles. A Russian counterattack on Lodz on November 11 was defeated by the German Army, but a further Central Powers advance was stopped after a failed offensive into the Carpathian Mountains by the Austro-Hungarian Army. The Eastern European winter set in and the advance of the Central Powers was finally stalled, leaving the Russians still in control of Eastern Poland. As the Allies in the west planned to break the German lines in 1915, the Germans planned a crippling assault in the east.
1915
As 1914 turned to 1915, the Russians began to refill their armies with fresh conscripts, but after the defeats of last Autumn they had to rushed to the front and thus were given poor equipment and unsatisfactory training. The Russian opened the fighting that year on January 31 with an attack on Bolimów, on the front line between the Germans and Russians. But as the Germans had spent the winter reinforcing and building up the defenses around Warsaw, that seemed like an unlikely place for the Russians to be attacking. The Russian second Army, lead by General Smirnov, attacked the town, a vital railway link between Łódź and Warsaw. But the Germans defended their position with a new and deadly weapon of war, poison gas. Several thousand gas shells were fired at the Russians, blowing xylyl bromide, a tear gas, towards the Russian lines. However, the cold weather managed froze much of the gas, making it ineffective and ultimately only causing few casualties for the Russians. But regardless of their use of gas, the Russians launched an attack on Bolimów with 11 divisions, but this was beaten off by conventional German artillery. The Russians suffered 40,000 casualties in the battle, and thus the Russians Second Army was forced to return to its lines.
By February 7 the Russian Tenth and Twelfth Armies were the main defenders of the northern front, and as the Germans now planned to knock the Russians out of Poland to begin a massive push eastward. In the middle of a blinding snowstorm, the German Eighth launched a surprise attack against the Tenth Army commanded by Thadeus von Sievers. The attack was a destructive blow to the Tenth Army, and they retreated a total of 70 miles east within the next week. The Russian Tenth Army retreated in disorder and the German Tenth Army moved against, and surrounded, the Russian 20th Army Corps in Augustow Forest. The Russian Tenth Army moved to establish a defensive position, but by February 20th they were again attacked by the German Eighth Army and was again forced to retreat. The 20th Army Corps surrendered on February 21, and the following day the German advance was stopped after the Twelfth Army counterattacked, inspired by the 20th Army Corps last stand. The German offensive was stalled now but not over, and by now much of the Tenth Army lay in ruin and the Twelfth Army was all that was left to defend northern Poland,
Throughout the end of Winter and the beginning of Spring on the Eastern Front the Central Powers were able to hold their lines as the Russians continued to try countering their advances and retaking Warsaw. The Germans and Austro-Hungarians had now wished for a counterattack, and General Hötzendorf wished for the breakthrough in the south while Ludendorff wished to see a combined offensive to smash the Russians in the north and south. But the German commander was convinced by Hötzendorf to focus on the south, and more specifically in the area around Gorlice and Tarnów, where the Austro-Hungarians had recognized a gap between the Russian Fourth and Third Armies. The offensive began on May 1 and the combined Central Powers offensive was opened by an attack of the German Eleventh Army and the Austro-Hungarian IV Army, attacking the Russian Third Army. After a heavy bombardment of the Russian lines the Central Power Armies launched a surprise attack on the Third Army, and concentrated 126,000 soldiers on a 35 kilometer-wide (22 mile-wide) sector where the Russians had five divisions and 60,000 men concentrated with weak defenses.
The Russian defenses collapsed, the Third Army was left at the mercy of the Central Powers and the Russian Army suffered massive casualties all across a wide front where the Germans and Austro-Hungarians had broken through. By May 19 the Russian lines had been depleted and the Russian Army, or what was left of it, was forced to retreat from Galicia. On June 3 the Austro-Hungarians made a massive second push against the Russians and used their Fourth and Seventh Armies to flank the Russian Eleventh Army and by June 17 the Russians fell back to Lwów and the Austro-Hungarians recaptured the Dneister River, which they had lost with Lwów late in 1914. In total the Central Powers offensive advanced 160 miles into the Russians lines, destroyed their Third Army, tarnished their Fourth Army, and the Russians lost 1/3 of their remaining land in Poland. At this point, rather than fight the Central Powers again for the control of Poland, the Russian General Staff instead decided to instigate a full withdrawal of the Russian Army from Poland. This Great Retreat lasted from August to September of 1915, and the Germans and their allies moved in to capture what areas had been vacated by the retreating Russians.
By September 15, the Germans had reached deep into Russia, captured Brest-Litovsk and Vilna, and now much of Lithuania was under the control of the German Army. The Germans then launched an attack towards the major Russian city of Minsk in September, but after succeeding in capturing two Russian division failed to make any major territorial gains and ultimately retreated after the failed offensive. Soon after the troops settled and 1915 turned into 1916, the war seemed as if it could not get any worse for the Russians, but it soon would.
1916
As 1916 opened, the Russians had been co-ordinating with their Western Allies to launch a crippling, two-front offensive against the Germans. Although the offensive wasn't supposed to begin until the summer, French General Joseph Joffre requested the Russians begin an offensive in Spring 1916 so as to allow the Germans to focus on the Eastern Front. The Russian Second Army, 350,000 strong after reinforcement over the Winter, was preparing to fight the German Tenth Army, depleted to 125,000 after the 1915 offensive actions. The Russians began their offensive with a two-day long artillery bombardment against the Germans, but their guns were in poor condition, their ammunition ineffective and their targeting inaccurate. The Russians failed to destroy the German artillery with their own and the Russians crossed between trenches in groups, leaving them mobbed in front of German machine-gun fire. The attacking Russians failed to make any major gains and did not inflict any great damage on the German defensive lines. The Germans launched a counterattack in April and the Second Army was defeated, suffering 125,000 casualties and 340 guns of their own were captured.
After their defeat at the Battle of Lake Naroch, the Russians prepared for their part of the combined Allied offensive. The offensive was commanded by General Alexei Evert, who was given command of the offensive in late 1915 after Tsar Nicholas II took complete control over the entire Russian Army and gave Evert, one of his main supporters, this command over General Aleksei Brusilov. Evert gathered together 40 infantry and 15 cavalry divisions for his massive counterattack, aimed at recapturing the cities of Kovel and Lemberg. He planned to attack the Austro-Hungarians rather than the Germans, whose lines (the Austro-Hungarians) were made up of 39 infantry and 10 cavalry divisions, and formed into three defensive lines of trenches. Evert used reserve soldiers at the request of Brusilov to dig his own trenches to disguise his forming lines and moved his soldiers between 75-100 yards of the Austro-Hungarian lines along a 300-mile long front across the Austro-Hungarian defenses. The General Staff, however, convinced him to shorten his frontal assault to 250-miles to allow for a better concentration of troops.
The Evert Offensive began on June 4 with a massed, but brief, artillery offensive along the Austro-Hungarian lines, which although better than that at Lake Naroch, was still ineffective at clearing the Austro-Hungarian lines. The Russian numbers managed to break the Austro-Hungarian lines at Kostiuchnówka on June 6, allowing three of the Russian's four advancing armies to break into the Austro-Hungarian defensive lines. The Russians also used shock troops trained under the command of Brusilov, a tactic later to be mimiced on the Western Front by the Germans, which allowed them to open their breakthrough. By June 8, the Russians had taken Lutsk, which Austrian commander Duke Josef Ferdinand had barely managed to pull out from the day before. The Russians took 200,000 Austrian soldiers prisoner in this period of time, but Evert eventually ordered his soldiers to stop and wait for their rear lines to catch up, giving the Austro-Hungarians time to bring in reinforcements of their own soldiers and Germans. The Russians resumed their offensive on June 18 and met disastrous results as the reinforced Austro-Hungarian drove them back and began to plan for a counterattack. The Russian offensive had failed, and by late-June the Central Powers prepared for a counter-offensive to push the Russians back and beyond.
As the Austro-Hungarians moved to counter the Russian offensive, the two armies met at Kowel, 22 German and Austrian divisions had stalled 29 Russian infantry and 12 cavalry divisions in the area. By this point the Russians had diverted to charging attack in massive numbers, but as the Russians attempted to break the Austro-Hungarian lines, they were stopped and their barrage on the Central lines failed. The Central Power Divisions counterattacked and the Russian offensive was finally broken and the Russian lines broke down. The counterattack demolished an entire Russian Army by mid-July it had turned into a full-blown counteroffensive, using three Central Power Armies to push the Russian lines back. The offensive pushed the Russians back far enough that they had lost most of their gains by mid-August and the beginning of September showed just how much the Russians had wasted. They had lost 1.3 million soldiers at the exchange of 450,000 Central Power lives, and a majority of the Russian casualties were in prisoners.
In the period of late-August to early-November the Central Powers launched an offensive aimed towards capturing Minsk in the north and Chisinau in the south. Two German Armies made the push towards Minsk beginning on August 29 and one German Army supported by two Austro-Hungarian Armies began the push towards Chisinau on September 1. Around 800,000 Russian soldiers were grouped into four armies that defended the Minsk area, but the Russians were poorly equipped, under-trained conscripts with little morale. While the Germans attacking Minsk were soldiers, hardened by the offensive to the south and well trained in fighting, and more importantly backed by the supply of the German Army. The German attack on Minsk began on September 2, the first army defending the city was flanked by the two German armies, who took massive amounts of prisoners. They were reinforced by six separate divisions of the Ninth German Army and moved to surround the envelope the city, much like the Germans had done at Warsaw. The city was already been starving under the brunt of the war effort, and so few supplies were to be found as the Russian supply lines were cut-off from behind. The Russians launched a substantial break-out towards the northeast, but only one army was able to escape the German siege. Minsk fell on September 23 and the two remaining armies in the city were forced to surrender to the German Army.
The attack towards Chisinau, with more soldiers and resources to work with, went far more smoothly as the broken Russian lines could do little to defend along the advance towards the city. Chisinau was defended by three Russian Armies, the Third, Seventh, and Eleventh, but was still just as susceptible to the Central Powers' advance as Minsk. The city was also a large transportation hub, and so the Russians were able to replenish their lines with reinforcements, making a prolonged siege an unlikely course of action. The battle was to become one of the last great uses of cavalry in the war, as the Austro-Hungarians deployed 8 cavalry divisions in a rapid attack on the Russians defenses from the south. This coupled with a heavy, yet quick bombardment on the front of the Russian lines, suprised the Russian commanders and allowed for a successful Austro-Hungarian assault on the city. The first Russian line was broken up with a frontal infantry assault after it was weakened by the bombardment, the second line of Russian defenses, on the outskirts of the city, had to be broken up with a concentrated attack by fourteen divisions on their weak right flank. The city soon fell on October 8, and the with it the Bessarabia Governate of the Russian Empire.
The fighting on the front in 1916 was disasterous for the Russians, they regrouped their armies after two years of failed offensives and successful ones on the Central Powers side. Casualties of the Russian Army had reached into the millions in those who were dead, wounded, and the unfortunate many who had been captured. The Germans and Austro-Hungarians were prepared to fight back against any other Russian offensives along the broad Eastern Front. But political forces, and more specifically, revolutionary political forces were manifesting in Russia and regrouping after the failed Russian Revolution of 1905. But now that the Russian Army was weak, the Tsar unpopular, and the populace angered and starved, the time had come for revolution,
1917
On March 8, 1917 according to the Gregorian calendar, but February 23 according to the Julian calendar then used by Russia, the forces of the Socialist Revolutionary Party of Russia mobilized into open rebellion against the Tsarist government. The revolution broke out spontaneously after bread rioters and industrial strikers, backed by dissident Russian soldiers of the garrison of Petrograd. Loyal troops were stationed at the front while more dissident soldiers joined the ranks of the growing revolution and Petrograd fell into a reign of chaos. For five days the center of the Tsar's power was shaken by rioting, military violence, and strike actions by forces clamoring for reform in the Russian Empire. Finally, on March 20, the Tsar Nicholas II abdicated the throne and announced he would be replaced by a provisional government lead by Georgy Lvov, a member of the Constitutional Democratic Party. The Provisional Government was forced to co-operate with the Petrograd Soviet, a socialist political organization centered in Petrograd and was originally headed by Nikolay Chkheidze.
The two co-operated under the Dual Power system, which worked to bind the two to create order where otherwise anarchy would certainly reign. Although officially they were both a part of the Russian government, the two were, in fact, constantly competing for political power in Russia. Superior power was held in the government by the Soviets after they issued Soviet Order No. One, which officially stated that all actions of the Provisional Government were to only be enacted if they did not interfere with the will of the Petrograd Soviet. The Provisional Government had neither the power or legitimacy to fight the Petrograd Soviet and had wanted at all costs to avoid civil war in Russia. On April 3, 1917 the Soviets gained a new leader when "professional revolutionary" Vladimir Lenin arrived by sealed train in Petrograd from Zurich. Thus he assumed to try and combine the revolutionary forces outside of the Provisional Government under the ideals of communism. While the communists supported the end of the war against Germany, the Provisional Government decided to stay in World War I under pressure of the Allies and to try to prove the Provisional Government as a superior force than the Soviets.
On July 1, the Russian Army launched the July Offensive, Russia's last big offensive action of the First World War. The offensive was planned by Russian Minister of War Alexander Kerensky and Russian General Aleksei Brusilov, now the leading general of the Russian Army. Kerensky had hoped that a big Russian victory would serve as good propaganda for the Republican government of Russia, restore military morale in the Russian soldiers, and giving a much needed victory to what Kerensky called "the most democratic army in the world." Thus the offensive opened with Russian soldiers attacking German and Austro-Hungarian soldiers in the Ukraine and Galicia and involved three Russian Armies, the XI, VII, and VIII Armies. The Ukraine was defended by two Austro-Hungarian Armies and a single German field army to back them up, making the area seem like the best target for the weak Russian army.
The Russian use of a powerful bombardment to open the offensive gave the Russians considerable early success in July. Gaps in the Austro-Hungarian lines were exploited by the Russians and the Austrians proved unable to resist the Russian attack and were forced to wait for German assistance. The Germans were unavoidable to the Russians and they put up a stiff resistance against the Russians which resulted in heavy casualties on the Russian Army. Eventually as they reached into the Galicia, the Russians began to encounter substantial casualties and the only upper hand they held towards mid-July was superior numbers in cavalry, which soon proved to be useless against massed German machine guns. Eventually German artillery tore apart many Russian soldiers and morale diminished, leading to the stalling of the offensive. Russian shock-troops proved to be ineffective in keeping the offensive moving and the Russians' poor training reared its ugly head. Even worse was the increase in beauracracy as officers would give orders to their soldiers, but these orders would have to be discussed by soldiers' committees. The Russian advance stopped altogether on July 16, followed by a Central Powers counterattack on July 19, resulting the the Central Powers Summer Offensive of 1917.
Resultantly between July 16-July 20 occured the July Days uprising in which Bolshevik and Anarchist forces lead by Vladimir Lenin and Leon Trostky launched a massive uprising against the Provisional Government and Menshiviks of the Socialist-Revolutionary Party. The fighting raged throughout Petrograd as the Army of Russia tried to quell the rebellion of workers, sailors and dissident soldiers. It would eventually involve hundreds-of-thousands of demonstrators, thousands of Red Guard soldiers and other dissident army soldiers fighting against thousands more of policeman, loyal soldiers and even Cossacks. Eventually the fighting was over and the rebellion quelled by July 20 and Alexander Kerensky became Prime Minister of Russia and the Minister-Chairman of the Russian Provisional Government. He ordered Lenin, Trotsky and many other Bolsheviks arrested, accusing them of high treason and revolting with German backing. Lenin fled to Finland, outside of Kerensky's control, but Trotsky and many other Soviet leaders were captured on July 22. The Petrograd Soviet lost much of its power and the Dual Power ended, but Trotsky would be released later in August 1917.
The combined Austro-Hungarian and German offensive in the summer of 1917 raged throughout the remainder of the summer. Large areas of land were captured in the Ukraine, Belorussia, and the Baltic areas, each a separate defeat for the loyal soldiers of the Provisional Government. Finally on August 21, the offensive ceased as the Germans feared they may have seized too much land and needed time to allow their supply lines to recover. The Russian people looked at the state of their Army in disgust and the Bolsheviks again grew in power, and on October 23, 1917 (according to the Gregorian calendar) the Bolshevik's Central Committee voted in a 10-2 resolution for an armed uprising against the Kerensky government. On November 5 the Bolesheviks in Estonia launched an uprising against the Provisional Government, followed two days later on November 7 by the beginning of the October Revolution (as it occured between October 25-26 in the Julian calendar which Russia then used). After the events in August, Vladimir Lenin returned to Russia to plan the uprising and was supposedly leading the uprising as it fermented in the streets of Petrograd. Russian Bolsheviks attacked and seized the Winter Palace, the safeguard and base of Kerensky's government. On November 7 the revolution began to sweep Russia, gaining control of Petrograd, Novgorod, and soon afterwards Moscow.
The Soviet government offered the Germans the chance to end the war, which the Germans promptly agreed to, wishing to focus more fighting on the Western Front. Russian leaders and diplomats met with ambassadors of Germany and Austria-Hungary over the course of the winter of 1917-1918. Eventually, on March 3, 1918 the two sides signed the Treaty of Brest-Livotsk, signed between Germany, Austria-Hungary, Bulgaria, Russia, and the Ottoman Empire, which had defeated Russia in a campaign in the Caucasus region earlier in the war. Germany envisioned a massive group of German-allied states to be created after World War I to defend them like a shield from any possible further Russian offensive actions, either in the war or in the near future. The area Germany occupied as a result of the treaty held 1/4 of Russia's industry and population, and 1/9 of Russia's coal deposits. Russia was forced to give back Turkey all of its territory seized in the their war in 1878, and also to recognize Turkish occupation of much of the former Russian Caucasus. Both areas would later be turned into client states for the Central Powers, and the Soviets were allowed to maintain control over the what parts of Russia remained in their hands. Meanwhile Finland also escaped Russia's grasp, fighting a war between January and May of 1918 against both communists in their own country as well as many that came from Russia. The Eastern Front had ended and now the Germans sought to moved their vast armies in the east to the west to prepare for a new offensive against France and Britain, now Germany's main enemies.
Balkan Front
As the war started in the Balkans, it was only appropriate that a good deal of the fighting occur on the Balkan front of World War I. While Germany was pre-occupied in Russia and France in 1914, it left much of the work in the Balkans to be left to Austria-Hungary, the Ottomans, and especially Bulgaria. Serbia, Montenegro, and Greece formed the main Allied Powers in the Balkans, but were heavily supported by the French, British Armies.
1914
To open the front, the Austro-Hungarian Army launched an invasion of Serbia on August 19 with four Austrian field armies, the Second, Fifth, and Sixth Armies. While the Serbian capital of Belgrade is on the border between Austria-Hungary and Serbia, the Serbs placed much of their army many miles off to the west, drawing off much of the first invasion from Belgrade. And in the opening battle of the war, the Austrian Fifth Army pushed into Serbia around Cer Mountain and the town of Tekeris. 200,000 Austrians fought around 180,000 Serbs, with the main engagement going om between August 16 to August 19. The Serbs slowed the Austrian advance as they approached the Drina River, and then managing to push them back. The Serbians then backed up their army with other divisions of Serbian Second Army, which seized back control of Cer Mountain. The Serbs tried to push the Austrians back further from the Drina River, but reinforced Austrian soldiers were able to stop their attack and the battle ended in a stalemate with both sides suffering significant casualties. The Serbs managed to stall the Austro-Hungarians' war plans and then planned to further push the Austrians from their land in September.
Between September 6 and September 9 the Serbians launched a counterattack, aimed at dislodging the Austro-Hungarian Army from the Drina River. The Serbians threw into the offensive roughly 240,000 soldiers, all elements of their Second and Third Armies, against the single force of the Austrian Fifth Army. The Third Army crossed the river, pushing back the Fifth Army, but the Austrians managed to regroup and counterattack, pushing them back across the river. The Second Army massed with the forces of the Third Army for a decisive push, but left their right flank exposed. The Austro-Hungarians captured several bridgeheads in a counterattack and managed to cross the river, attacking the enemy's weak flank. The Serbians at this time launched a counterattack across the river, moving in a massive frontal assault, but ultimately faltering against the defenses of Austrian machine-guns. Marshal Radomir Putnik, commander of the Serbian Army, ordered his forces back across the river, but then they only faced a sweeping attack on their rear by the forces of the Fifth Army. The Second and Third Armies retreated east, allowing the remainder of the Fifth Army to cross the Drina River and push the Serbs back again. Fighting along this part of the front stalled and ceased by early October, but the Austro-Hungarians had managed to cross the river and force massive casualties on the Third Army along the way.
With the resuming of the conflict along the front in November, the Austrians launched a new offensive aimed at destroying the Serbian's left flank at the Kolubara River, defended by the Serbian First Army. The Serbs of the First Army were under-equipped, and worse than that, they were heavily outnumbered, 250,000 Serbs fighting against 450,000 Austro-Hungarians. For the offensive the Austrians brought up the Sixth Army to assist in the fighting, and launched the actual attack on November 16. The Fifth Army moved to captured the town of Lazarevac, held by the Serbian Second Army in the north, on November 18. The corps of the Sixth Army attacked the First Army at the Mount Maljen, which fell to the Austrians on November 24, exposing the First Army to a flanking attack on its own left flank. The Second and Third Serbian Armies attempted a counterattack between November 26 and December 2, which the Fifth Army repulsed, and then moved to flank the First Army with the Sixth Army. Serbian general Zivojin Misic wished to have the First Army retreat, gather its forces, and then counterattack, but as the entire Serbian Army was deployed into single, long defensive line, Marshal Putnik said no. But against Putnik's orders, the First Army did withdraw with Putnik's knowing, leaving the Serbian Army's left flank wide open.
The Second Army was suprised by the flanking attack, and the attacks on the Second Army lasted until December 15, at which point the Second and Third Armies retreated to the southwest, joining up with the First Army. With this failure, the Serbians were forced to abandon their capital city of Belgrade, which fell to the Austro-Hungarians on December 23. And then as if the Serbian position couldn't get any worse, the Bulgarians entered the war with the Central Powers and now planned for a combined offensive against Serbia in 1915.
1915
The offensives of 1915 would come to define the front, the spring of 1915 opened and the Bulgarians and Austro-Hungarians resumed the offensive against the Serbian Army. The Serbs had used the winter break in fighting to withdraw their army to the Morava River, and spent the remainder of their time to build up modest defenses along the river as well. But now that the Central Powers had two armies on both sides of the Serbian defenses, they planned to flank and crush the Serbian Army with a Bulgarian offensive on their rear lines. The Bulgarians began their offensive on March 23, at the very opening of Spring, with the power of their First Army. The Serbs could only afford 80,000 reservist troops to guard their rear, which stood little chance against the Bulgarians. The Bulgarians focused on the Serbs flanks at Pirot and Negotin, moving around the Serbian defenses and attacking them from the behind. A heavy bombardment along the front softened up the Serbs enough to the allow for the success of a wide-ranged Bulgarian offensive on March 29. The Serbian reserves retreated under the weight of the Bulgarian advance, leaving the rear of the Serbian Army exposed, just as the Central Powers had hoped.
The Bulgarians defeated the majority of what remained of the Serbian defenses at the Battle of Zajecar on April 3, and on April 5 the Austro-Hungarians along the Morava River launched a general offensive across the front. This assault, also presipitated by a heavy bombardment, stood more firmly against the Austrian advance, but Marshal Putnik was aware that Bulgarian forces were rapidly approaching his rear lines, and so hoped that they could retreat to a more favorable position. The Serbian Armies withdrew to the south in a rapid fighting retreat, hoping to out-run the Austro-Hungarians while also avoiding the Bulgarian Army. The Serbs retreated to the south bank of the Morava River, building up a defensive line around Nis, Krusevac, and Raska, bolstering their lines with Montenegrins and Albanians coming in from the south. The Central Powers were stalled, but not stopped, and simply waited to regroup, link-up, and establish a massive line of defense along the Serbian lines, in the case of another Serbian counterattack.
The Central Powers by May 1915, were finally ready for the knock-out blow to defeat Serbia, with two Austro-Hungarian Armies, the Fifth and Sixth, supplemented by two more Bulgarian Armies, the First and Second Army. Having surrounded the Serbs along their new, broad front, the Central Powers launched their offensive on May 1, starting with a powerful, 12-hour long artillery barrage, and eventually followed by a massive infantry assault. While the artillery was rather successful in disturbing the Allied lines, it ultimately failed in the prospect of demolishing the Serbian lines as it had. The first assault on the Allied defenses was rebuffed, a second one, using cavalry, was also defeated, but the third assault, using mutliple night-time trench raids, was a breakthrough and the demoralized Serbs retreated. Central Powers forces then launched a broad offensive into Serbia with fresh troops that forced the Serbs into constant retreat. Then on June 13, the Bulgarians launched an offensive with support from the north to attack Kosovo. Kosovo and Macedonia were now the only areas in Serbia where the Serbian Army still held their own land in their lines. Here Putnik and 150,000 soldiers left of what was the Serbian Army launched their valiant last stand against the Central Powers.
The Serbs now only had a force smaller than a single field army left to defend their homeland from four combined Central Power Armies. The Serbs were forced south by the Bulgarians from the South Morava, and the Bulgarians captured the city of Pristina on June 16. 20,000 Serbian soldiers valiantly defended the town of Prokuplje and its surrounding mountains from Bulgarians. For two days between June 19 and June 21 the town resisted until roughly 5,600 Serbs had died and they were forced to retreat to the south once more. The Serbs attempted another last stand at Gnjilane on June 24, but the Bulgarians again broke through and the Serbs retreat more-so into Kosovo. With the support of Austro-Hungarian and German soldiers, the Bulgarians advanced further into Kosovo, capturing Prizren on July 4, ending the fighting in Kosovo, and resulting in the final surrender of the Serbian Army. Marshal Putnik had wanted to lead a force of Serbians into Albania and Greece to draw out the war and keep Serbia's hopes up, but King Peter of Serbia decided not to. The collapse of Serbia was quickly followed by the Greeks invasiona and occupation of Serbian Macedonia against little resistance, allowing the Allied forces of Britain and France a chance to hold on to some part of Serbia to keep resistance alive, allowing Putnik and King Peter to lead the 20,000 Serbian soldiers left to fight another day.
Gallipoli
While the Bulgarians, Austro-Hungarians, and Serbians duked it out in Serbia and Kosovo, the British and French planned a naval operation to knock out the Ottoman Navy and open a supply line to Russia. In mid-February the British began a naval operation to destroy the numerous naval yards and forts along the Dardanelles in Turkey. The British were forced to divert forces of the Royal Navy from the campaign against the High Seas Fleet to the North, a total of 16 battleships, three battlecruisers, 24 cruisers, 25 destroyers, eight monitors, and 14 submarines. The Ottoman Navy had been on the decline for centuries now, but the Germans and Ottomans were confident that their combined use of submarines, mines, fort defenses, and the small Ottoman Navy could defeat the British Navy. Prior to the war the Ottomans had purchased two dreadnoughts from Britian, the Sultan Osman I and the Reshadieh, which they had acquired, after the Sultan's demandings, quite rapidly. The Ottomans used these battleships in hit-and-run attacks on smaller ships, leaving the enemy cruiser and battleships to their land defenses.
The only major naval engagement along the Dardanelles occured on March 18, when a combined Franco-British fleet passed through the Dardanelles. The British made up the core of the fleet, with the French making up their flanks. They sailed into Ottoman territory, only to be fired upon by a series of Ottoman defenses, with four enemy ships suffering serious damage. The Allies returned fire, not silencing the Ottomans, but lessening their fire enough that the French felt confident and withdrew their line of ships to allow the British ships to sail ahead. But the Allies and their seaplane carrier, the HMS Ark Royal, had failed to sweep for mines effectively, and this began to take a serious toll on the British ships. The French ship, Bouvet, struck a mine when turning to starboard and had capsized within minites, killing 639 men. The British had not anticipated mines and so thought that the ship had been torpedoed, but decided to continue the attack. The HMS Inflexible soon after also hit a mine, killing 30 men, but not capsizing it, and by the end of the fleet's trip they had three ships: the Gaulois, Inflexible, and Suffren, damaged, and three more ships sunk: the Irresistible, Bouvet, and Ocean. At the end of their trip they were engaged by a group of four German submarines, along with the two Ottoman battleships and three Ottoman cruisers. In the resulting battle, the HMS Agamemnon was sunk, the HMS Queen Elizabeth was heavily damaged, and the Lord Nelson was slightly damaged. The Ottomans had won this victory at only the loss of one cruiser, after this the British and French began to think that the naval attacks weren't being effective, and that a knockout blow against the Ottomans on land were necessary.
On April 25 the Allies landed five divisions on the Gallipoli Peninsula, 127 miles away from the Ottoman capital city, Istanbul. A significant force of Australian and New Zealand British Army volunteers made up the ANZAC Corps, who would play an important role in the coming battle. The Ottomans themselves had 6 divisions prepared to defend the area, and these soldiers were commanded by General Esat Bulkat. The British had allowed a six-week delay between when they had finished gathering their soldiers for the attack in Egypt and when they actually landed in Gallipoli, giving the Ottomans significant time to prepare. The Ottomans focused on defending the high ground around Gallipoli, but did not know where specifically to concentrate as they only had a general idea that the Allies were to land in Gallipoli. The Ottomans moved their six divisions here in this time, and to allow for even better resistance, two German divisions are placed in Gallipoli under the command of General Otto Liman von Sanders, along with these Germans came three battalions of German artillery to support that of the Ottomans. When the British and French finally landed, they were unprepared for the level of defense the Ottomans and Germans had built around Gallipoli.
Throughout the next two days the British and French landed forces along southern Gallipoli before actually advancing. When they did some got as far as 500 yards before they were encountering Ottoman soldiers, but when the Ottomans caught wind of the British landings, they moved in to crush them. Throughout May 1916 the Ottomans launched numerous land attack, looking to dislodge the British from their positions. While they ultimately failed to dislodge them, the British suffered significant casualties in the process of defending their gains. The British reinforced their lines with more soldiers, especially French ones, in June, planning for an attack in July. But the Ottomans, reinforced with German support, began an artillery barrage to knock out the Allied landing ships. The ships were forced to move in under the cover of night, but eventually the Ottomans were attacking by land, making for a decisive push on June 2. Their main point of attack was against the ANZAC soldiers situated to the Allied left, where they percieved the weakest troops were located. The ANZAC soldiers put up a stong resistance against the Ottomans' predictions, but the Ottomans eventually brokethrough and pushed into the Allied lines. Decisively, the Allies ordered the evacuation of Gallipoli on June 19, ending the campaign in a humiliating Allied defeat.
Macedonia
After Gallipoli the Central Powers held an obvious advantage over the Balkans Campaign, their soldiers occupying most of Serbia and an invasion of Montenegro and Albania seeming like no challenge. With this security the Bulgarians planned for a decisive offensive that would not only defeat Serbia once and for all, but would also knock Albania out. On October 17, the Bulgarians launched an invasion of the Allied-held territory of Macedonia, which the Bulgarians had been assigned to possess in the 1878 Treaty of San Stefano. The first major battle occured between Bulgarian and French forces on October 17 at Krivolak, where the Bulgarian Second Army moved to destroy the force of three French divisions. The French were backed by two regiments of Serbs, and the Bulgarians were seated across an open front, as were their French adversaries. But the Bulgarians moved one divisions to attack the regiments of Serbs situated on the French left. When the Serbs broke and withdrew east, the Bulgarians were able to surround the French forces, not situated in a formation like a fishing hook. The French retreated on October 23, by this point having already suffered high casualties, but moving out just before the Bulgarians could make a deadly final assault.
The Allies then launched a counterattack towards the south-east of Macedonia towards Doiran, a town on the Greek-Macedonian border. The Allies threw into the battle four divisions, three French, one British, against an area defended by only one Bulgarian division. The attack began on November 6, and was followed by four long assaults, all of which eventually failed to defeat the Bulgarians. When news had come that the battle was being waged, two Bulgarian divisions were sent to reinforce the Second Thracian Division, which was defending it already, and to launch a counterattack. The Bulgarian counterattack occured on November 18, with a push to attack along the Allied left-flank, defended by the beleagured British division. The Allies retreated and the Bulgarians were able to make modest gains across the region, but eventually reinforcements from Greece allowed the Allies to stabilize the front.
Throughout the rest of November the Bulgarians and Austro-Hungarians steamrolled through Macedonia, facing only major opposition when they approached large cities or populated areas. Eventually by late November, despite lower temperatures, the Bulgarians made a continuous push into Macedonia, eventually only stopping for the winter snowfall. When the March thaw did finally come in 1916, the Bulgarian and Austro-Hungarian Army launched a renewed offensive with 10 divisions towards Skopje, the main cultural and political center in the area. The city fell easily to the Central Powers' campaign, and with the fall of Macedonia throughout Spring of 1916, the campaign continued as the Central Powers built up their Greek-facing flank and prepared for an attack into Albania.
The Albanian Offensive lasted from May 2 on until August 23 in 1916, and was marked by the severe failure of a combined Allied Army of Greeks, Albania, Britain, France, and the remnants of the Serbian and Montenegrin Armies to hold off a major enemy assault. The massive Central Power's assault moved towards the center of Albania, engulfing and surrounding the capital of Tirana and capturing the port Durres, at which point the country would be split in half. This manuever took little over three weeks, and with Tirana captured and Durres about to fall, Albania agreed to a surrender to the Central Powers, even though the Allies refused to leave and planned to hold out against the invaders. The Austro-Hungarians then launched a second offensive into northern Albania from Serbia and Montenegro with 240,000 soldiers. The area was defended mostly by remnant Albanians and Montenegrins, and so its easily fell to the Austro-Hungarian assault. In the final assault to take out Albania, Italy now lent a hand and landed 150,000 at the port at Vlore while more invading forces swept in from Macedonia and Central Albania. Although Gjirokaster didn't fall until September, the campaign all but ended in August, at which point the majority of Allied forces had retreated into Greece.
Romania
In August of 1916, just as Albania fell in the west, Romania and Britain signed an agreement to benefit them both, in exchange for Romanian-dictated terms in the Balkans, Romania would enter the war on the side of the Allies. The Romanian Army in 1916 was at a prime number of 658,000, against an army more than twice that size that was controlled by the Central Powers in the Balkans. To begin the campaign, Romania launched an offensive against Austria-Hungary into the territory of Transylvania, which was mostly populated by Romanians. The campaign began on August 15 as the Romanians crossed into the Carpathian Passes, which was lightly defended by Austro-Hungarian border units. But a lack of planning kept the Romanians from achieving great success, only taking the area up to Braşov, and then they moved up to the Olt River. It took the Romanians until mid-September to take the entirety of the river bank, which was now defended by numerous Austro-Hungarian divisions. But by the time they had reached beyond the river, they had advanced outside of their supply lines, and their offensive ground to a halt.
But in early September, the Bulgarian Army pushed into southern Romania towards the fortresses of Turtucaia. After four days of battle the fortresses fell on September 6, with 480 officers and 25,000 Bulgarians taken prisoner in the offensive. At this point the Romanian High Command halted the Transylvanian Offensive, and ordered the Army to retreat back into Romania to defend their homeland. After capturing the Turtucaia Fortresses, the Bulgarians moved to engage the Romanians at Dobrich, where a combined force of Romanians and Russians outnumbered the Bulgarian Third Army as it defended the area. And despite being outnumbered, the Bulgarians managed to defeat the Allied force and opened the way for the First Battle of Cobadin. A large Bulgarian-Ottoman force went into battle against an Allied force, again larger than their enemies, but still they lost. And by this time, the Central Powers had counter-attacked into Central Romania out of Transylvania, with this force being made mainly of Austro-Hungarian soldiers.
The counter-attack began on September 18, the Austro-Hungarian Ninth Army lead the charge, defeating the Romanian First Army in the beginning of the offensive. The Romanian Fourth Army retreated, despite only lightly being attacked, but was then shattered in an ambush on September 25 by the Austro-Hungarian Third Army. The Romanian Second Army was already defeated at Brasov when it was attacked by the Austro-Hungarian Seventh Army. Finally, on November 2, the Central Powers launched a decisive attack towards Vulcan Pass, crushing two Romanian divisions and opening a hole in the Romanian lines. But meanwhile at Cobadin, the Allies again launched an attack, now with 116 battalions from the Russian and Romanian Armies. This force attacked just 96 enemy battalions, but again the enemy was defeated, leaving much of Wallachia in a wide open gap as the Romanian Army retreated towards Bucharest. But by November 26, when the final Central Power troops pushed the Romanians away from Transylvania, leaving Bucharest all that was left.
On November 25, the Central Powers gathered around Bucharest and 250,000 soldiers besieged the city, defended by 150,000 Romanian soldiers. After the city fell to a Central Powers offensive, the Romanian government was captured in the capital, along with the Romanian monarch, King Ferdinand I, and his Prime Minister Ion I. C. Brătianu. However, even as large parts of the Romanian Army were casualties in the battle, many also withdrew north, establishing an HQ in Iaşi. With this the war in Romania was prolonged only until the spring of 1917.
When Spring 1917 did come the Central Powes controlled much of Wallachia and that only left Moldavia out of their hands.
Middle Eastern Front
The War Abroad
While the majority of fighting in World War I occurred in Europe and the Middle East, being a global war it did extend farther into a war at sea and abroad. The main battles were Germany and Britian fighting to extend global influence in Asia and the Atlantic while the war raged in Europe. The two main powers who were affected were the United States, which chose to remain neutral, and Japan, who was allied with Britain and chose to fight against Germany in this conflict.
Easter Uprising
Beginning on April 24, 1916 Irish nationalist groups lead by the Irish Republican Brotherhood and Irish Citizen Army rose up in an armed uprising, backed by the Germans, to overthrow the British and establish Ireland as an independent state. Ireland had been under British control for centuries, and after numerous failed attempts to gain independence, the Irish nationalists knew now that the time was right to strike and gain independence while the British Army was mostly off fighting on the Western Front. The IRB had been planning the uprising since 1914, when the war began, and they were promised backing and international representation by Germany when the war ended. The Irish worked to establish a common authority, with political leadership in the IRB and military action organized by the ICA. Meanwhile, Germany shipped them arms covertly, originally by U-boats during the 1914-1915 period, but then after the Battle of Jutland in 1915 their shipments escalated greatly in the days leading up to the actual uprising in 1916. The IRB and ICA, during this time, were combining leadership under the Irish Military Committee, seven members, representing seven areas in Ireland.
The Irish also used coded messages via radio, using words like "parade" to mean military actions, making it seem like normal Easter planning information in the days leading up to the April uprising. Easter was chosen as the day to begin the uprising due to its religious importance and the idea that the British wouldn't be suspecting an attack on such an important day. Supplies continued to flow into Ireland in the days of February and March, and the ICA's numbers steadily grew, eventually reaching as much as 4,000 soldiers in Dublin alone, with roughly 8,000 other partisans located across the island. British Naval Intelligence remained knowledgable to the shipments, but as the navy grew weaker after Jutland, and the Army was off fighting the war in Europe, the British relied mostly on military and local policemen to seize whatever shipments they could intercept. Eventually, on April 24, Easter Sunday, everything was in place and the Irish were prepared to strike, and at around 12:00 PM on Sunday, a call rang out across the radio in Dublin ordering the uprising to begin.
First, 1,200 Irish rebels seized positions in central Dublin, they seized banks, government offices, mainly the General Post Office, and O'Connell Street, the main thoroughfare of Dublin. One of their other main targets was the Royal Barracks, housing the Royal Dublin Fusiliers, which they eventually had to besiege. Alongside the Irish Citizen Army, the Irish Volunteers Corps was established as a separate paramilitary wing to be made up of citizens who joined after the uprising began. Two days into the uprising, the Royal Barrack fell, the Royal Dublin Fusiliers surrendered, the building was renamed the Collins Barracks, and much of the rest of Dublin now lay in Irish hands. General Sir John Maxwell was to lead a force of 10,500 British soldiers who were lead from Britain, as the British Command thought Irish soldiers couldn't be trusted in an anti-Irish offensive. This required more time to secure the units neccessary, only giving more time to the Irish revolutionaries who were seizing cities across the island.
By April 30, the Irish were in control of Dublin, Cork, Galway, Limerick, and Kilkenny, and were in a fierce fight against British soldiers for control of Waterford. On this day the ICA and Irish Volunteers combined forces to form the Irish Republican Army as the sole military front against the British, under the political leadership of the Irish National Government, made up from the leaders of the Irish Republican Brotherhood. The INA officially declared Ireland independent as the new Republic of Ireland, which was recognized on May 1 by Germany, Italy, Austria-Hungary, Turkey, and on May 3 by Bulgaria. The IRA's numbers now swelled to include roughly 24,000 soldiers as Maxwell now had gathered his forces and moved across Irish Sea to launch a counterattack through Northern Ireland, which remained largely under British control. But the British Command, despite Maxwell's urges, still refused to allow him to use loyalist Irish troops to supress the rebellion. Meanwhile, the Irish had seized control of much of Ireland, many of its southern and central cities, and much of the central plains were falling under INA control by the day.
Maxwell moved into central Ireland, with a force of now 12,000, supplemented by loyalist Irishmen against Maxwell's orders. He had planned to garner control of the nation's center, cut off the roads which connected the Irish overland supply lines, then to seize back the cities which they had lost. But the IRA waged a guerilla campaign against Maxwell's army, using hit-and-run tactics to slowly, but surely, decrease his numbers. Still though, Maxwell achieved moderate success, and moved in to recapture Dublin by May 17. But the Irish were well prepared to defend the city, but then recieved more help from the British Command itself, which had learned of Maxwell's use of Irish soldiers and reprimanded him as such. They ordered Maxwell to return to England, along with his army, which Maxwell argued would only secure the Irish their victory. the British Command did not believe the Irish had the power to exist as a country, and were certain that a second, larger expedition would bring about their collapse. Maxwell was court martialed, found guilty and was stripped of his command, which was then handed to William Henry Muir Lowe, who was given an army of 24,000 British soldiers with which to quell the rebellion, this one including a larger volume of cavalry, two whole cavalry regiments.
By early June, when W.H.M. Lowe had arrived in Belfast, much of Ireland was now in rebellious hands, and the Irish Revolutionary Army was making a march for Newry, in Northern Ireland. Lowe had prepared the town's defenses and set up his soldiers in lines with cavalry on the flanks, as if to fight a pitched, 19th century battle. The Irish, meanwhile, having heard of Lowe's defenses, instead planned to march around the British and attack the town from the north. The British attempted to use their cavalry to defeat the Irish attackers, but were beaten off by a company of Irish machine-gunners. The Irish then used two armored cars, attacking into a company of British infantry, spreading chaos, but ultimately being destroyed. The Irish took advantage of said chaos and launched a major attack on the town, which Lowe was set on defending. But after seeing his cavalry defeated in a second charge, Lowe ordered a retreat to the north, now without much of his cavalry. While he was then able to cease a further Irish assault into Northern Ireland, he has suffered significant casualties, and the Irish were now gearing up for an attack farther to the west at Clogher.
Lowe realized his lines would be spread too thin if he attempted to stop more than one attacked, and realized that his situation may have become hopeless. He wrote to the British General Staff, asking if he could now raise a corps of loyalist Irishmen, making sure to stress how dire the situation in Ireland was becoming. The British General Staff relented and Lowe began to raise his First Irish Corps, made up mostly of soldiers from Belfast and Lisburn. The Corps was made up of 5,000 Irish loyalist partisans, who were sent to the front line in July to hold off the Irish advance towards Clogher. When the IRA recognized that these were Irish soldiers, they sent a messenger to the Irish Corps' commander, requesting that they join the rebellion against Britain. The Corps' commande rejected these terms and told the Irish messenger "we fight for the crown, even if that means death." The next day these words became known in history as the reasoning for the Battle of Clogher, 4,500 IRA soldiers fought 3,000 Irish Corps soldiers, backed by 1,200 British soldiers. When the IRA gained the upperhand, the British soldiers fled, but the Irish Corps soldiers stood and fought, losing 1,300 men in the battle, the rest wounded and retreating.
After the loss at Clogher, Lowe began to treat this like a real war and ordered a general retreat to establish a definitive defensive line, between Armagh and Derry, with Lowe establishing HQ in Belfast. The Armagh Line became the main defensive line of the British Army from which they hoped to defend Northern Ireland. The Irish attempted three times between August and November to breach the line with major assaults, eventually resulting in a stalemate, just like what had developed in France. Throughout 1917 the battle remained a stalemate, allowing both sides to raise more soldiers, the British raising their lines to 40,000 soldiers, supported by 18,000 Northern Irish loyalists. The Irish, on the other hand, raised an army of 180,000 in the Irish Revolutionary Army, and as the ING settled its power in Dublin, a provisional assembly was called for to represent all of Ireland. Representatives were sent from all of the corners of Ireland under ING control, and they began to draft a Constitution for Ireland in the old Bank of Ireland building in Dublin. It was from here they also communicated with the Germans in mainland Europe, and wrote out terms for a war-ending treaty that would include Ireland.
In 1918 in accordance with the German Spring Offensive, the Irish Republican Army launched an offensive towards Armagh, and broke through the British lines. IRA units flooded into the British-held territory, capturing British soldiers, and executing Northern loyalists who surrendered. Irish soldiers simultaneously broke through the line at Derry, and launched a two-pronged offensive towards Belfast. The British under Lowe slowly retreated towards Belfast, and with their gains came more execution, something that has come to haunt the Irish Republic to the modern day. The Irish reached Belfast in May 1918 and surrounded it on land, but left the British supply lines to the German U-boats at sea. By June 28, the Irish had cut off the city, bombarded it with German artillery, and then they offered the British ceasefire terms, if the British left the city, they would be unharmed and the Irish loyalists would be allowed to go with them. The Irish would also allow any Irish loyalists who wished the chance to leave the city for England. The British agreed, and on June 29 the city was captured by the IRA, who established martial law, and allowed for the British and their loyalists to cross the Irish Sea back to Britain. The Irish controlled the entire island, the Irish National Government gained legitimacy by adopting its new Constitution on December 29, 1918 and sending a group of representatives to the Versailles Treaty talks between 1918 and 1919. Ireland was now a new, unified, country and the ING prepared for a general election to be held in in 1919.
War in the Pacific
The Pacific has been a center of European conflict for ages, but only when in 1884, when Germany established the colony of German New Guinea, did the Anglo-German rivalry extend to the Pacific. The British, on the other hand, had been in the Pacific since the 17th century, and held multiple massive possessions, like Australia, New Zealand, and Malaya. The British also had the Japanese Empire on their side, the Japanese were a growing power in the Pacific, defeating China in 1894-1895, and Russia in 1904-1905. The Japanese Navy was a substantial force to be reckoned with, and the Japanese Army, now styled on the European powers, was something to be feared. The Germans only had around 10,000 soldiers in the Pacific, and a small squadron with only two battleships to defend its colonies. The Japanese had 12 battleships, two of which were dreadnoughts, the Germans seemed outnumbered and outgunned in the Pacific.
Siege of Tsingtao
The largest battle fought in the Pacific during World War I was the siege of Tsingtao, Germany's main possession in China. Japan and Britain launched a joint attack on Tsingtao, which was defended by 3,650 German infantry, several hundred artillery pieces, along with a small detachment of the German East Asia Squadron. The combined Allied force was made up of 24,500 soldiers, with 142 artillery pieces, backed at sea by three battleships, a battlecruiser, a destroyer, and a seaplane carrier for reconnaissance. Between October 17 and October 31, the Allies launched a naval blockade and bombardment of the German defenses, but the German forces held out. Finally, with the first Allied land assault, the German commander Alfred Meyer-Waldeck ordered a set of two defensive lines to be formed around Tsingtao to allow for a better defense of the city. The main series of defenses were around the hills, where the Germans had established artillery positions to add to their rings of defense. The Germans were prepared to call in reinforcements, but seeing as how much the Japanese and British had outnumbered them, they didn't want to do so unless necessary.
The German Navy, supplemented by forces of the Austro-Hungarian Navy, was able to successfully defeat the Japanese Navy in several sorties in the opening days of the siege. In a single engagement, a German torpedo boat, S-90, engaged and destroyed the Japanese cruiser Takachiho with a single torpedo, the cruiser weighed 3,000 tons and 271 seamen and officers were lost in the battle. Then on October 31, the Japanese built two parallel trenches along the German defenses, just as they had done at Port Arthur against the Russians in 1904. The Japanese combined both naval and land fire to lay extra pressure upon the German lines, but on November 2 the German East Asian Squadron arrived in force, intent on breaking the Japanese naval lines. In the ensuing naval engagement, two Japanese cruisers were lost, to German losses of several torpedo boats, the Japanese also suffered several other ships severely damaged. The Japanese Navy then withdrew from the blockade, hoping to move to the southeast and meeting up with reinforcements from Britain. But the Germans then gained the upper hand at sea and were now firing on the Japanese infantry, while the Germans on land were reinforced to 8,000 soldiers.
The Germans then staged a counterattack on land, with artillery and naval guns firing on the Japanese in preperation. Gathering their advantages of a sustained barrage, open supply lines, and superior training, the German infantry assault managed to break the Japanese eastern lines. The Japanese retreated, with 2,000 soldiers being captured in the breaking of the siege between October 4-7. The Japanese withdrew overland back to Port Arthur, now with the siege broken the first battle of the Pacific Theater was over, the Allies had lost. Germany now held the upper hand in the Pacific, but the British still held far more territory than the Germans and the war was far from over.
Singapore Munity
On February 15, 850 soldiers of the Fifth Light Infantry, a sepoy military unit, launched an uprising in Singapore after hearing that they would be sent to the Middle Eastern front to fight against other Muslims of the Ottoman Empire. Four more sepoy companies joined in their mutiny and the mutinous soldiers killed a large group of British officers. One-hundred soldiers seized control munitions from the Tanglin Barracks, where over 300 German soldiers were being interred after their ship, the SMS Emden, was taken by the British. The sepoys killed the British soldiers guarding the prisoners and the barracks, and the Germans joined the rebellion. A small group of medical staff that had remained unharmed had tried to leave and raise the alarms, but several of them were killed, the rest captured and 12 soldiers were left behind to guard them.
As it was the middle of the Chinese New Year the Chinese Volunteers Corps, the city's main defenders, were on holiday, leaving Singapore almost defenseless to the Sepoy and German mutiny. First the sepoys killed Lieutenant Colonel E.V. Martin, their former commander, before seizing a local radio station and broadcasting to German naval units that Singapore was undefended on land. The Royal Navy was still a presence in the area, and the likelyhood that British Marines would be coming soon was certain. The imminent threat was met by a section of the German East Asia Squadron, two cruisers, three destroyers, and three torpedo boats sailed into Singapore harbor, to find that two British cruisers and numerous support boats had beaten them there. The Royal Navy was prepared to land Marines, but the German Navy met the threat and the British were forced to retreat after one of their cruisers was sunk and the other was severely damaged. The British Navy withdrew, and the Germans landed 1,200 Marines of their own, capturing Singapore Harbor.
The Central Powers forces took the helm of the city's defenses, with the German Navy preparing for a naval counterattack. A combined Allied squadron of the French cruiser Montcalm, the Russian cruiser Aural, and the Japanese protected cruisers Otowa and Tsushima, now moved into Singapore. They were also hauling Marines, prepared to retake the crown jewel of the British Pacific Empire, with a force of 3,000. The city was defended by a toal of 1,500 Germans soldiers, 850 sepoy soldiers, and defended at sea by the German naval detatchment. The Germans were outgunned, but the news that the British were preparing a force of soldiers from Rangoon to launch a counterattack made the situation more dire. The Allies attacked German Navy, but they had divided up their cruiser force into two, so the Germans decided to tackle the eastern group first, risking possible land losses in Singapore, but then they would manuever and attack the Allies from behind.
The Germans moved to cap off the Allied T, using the guns of their cruisers to destroy the Aural, and then moving their torpedo boats around the Montcalm. The French cruiser was hit by two German torpedoes, and the boat had capsized in minutes, allowing the German squadrons, only suffering light damage, to turn around and attack the Japanese cruisers. The Germans moved to cut the Japanese cruiser force in half, firing the guns of both ships at the two Japanese cruisers while the German destroyers, who had been left behind to defend the harbor, moved out and surrounded the Otowa. The Tsushima, suffering moderate damage, withdrew and left for Rangoon, where the British infantry counterattack was being prepared. The German success in Singapore won them one of their enemy's most prized Pacific possessions, and the British force in Rangoon was repositioned to Malaya in case a German force moved up the peninsula and tried to take it from them.
The Tide Turns
Throughout the rest of 1915 and 1916 the German East Asia Squadron and the British Royal Navy fought several minor engagements across the Pacific. The German East Asia Squadron focused on cutting off British supply lines to Malaya and New Guinea, while they garnered forces for an attack. But the Japanese still remained a problem, an Army, 800,000 strong, and one less stretched-out than the British and Germans. But the Japanese Army was on the side the British, but their allegiance was buyable, and if the Germans gained the upper hand, it was likely that the Germans could win their favor. The German Consulate in Tokyo attempted throughout 1916 and early 1917 to gain Japan's favor and the use of their Armed Forces in World War I. The German East Asia Squadron gathered strength as several Allied ships were captured in the course of the exteneded 1916 campaign, including two cruisers, a destroyer, several submarines, and even a battlecruiser.
But despite these successes for the Germans, and the victory at Jutland, the Japanese still remained in the British camp. But the British had prepared a counterattack, aimed at attacking into New Guinea, the heart of the German Pacific Colonies. They had gathered a naval task force, a fleet of two battleships, four cruiser, five destroyers, and three submarines, and the had moved their forces around during the winter of 1916. The Germans had spread their forces thin across the Pacific, fighting a war that had spread the German Colonial Empire to include Singapore, southern Malaya, which they had won in the Spring of 1916, and numerous Central Pacific Islands which required a greater land presence in the Pacific. After the German victory at Jutland, this became slowly and slowly easier, and by 1917 the German's had two corps in the Pacific, roughly 25,000 soldiers, defending the area. But the German Navy was far harder to reinforce, and all the High Seas Fleet could spare was one pre-Dreadnought battleships, along with several U-boats, cruisers, and destroyers.
The British task force moved towards the German-held Pacific, towards the German-held area of New Guinea. They moved between Australia and New Guinea in the Torres Strait, they had prepared to attack the Germans from the south, but little did they know that the Germans had laid a trap. The British Royal Navy slipped past the island of Saibai, but they were then ambushed from the rear by a German squadron of U-boats, torpedo boats, along with two cruisers and two destroyers. The Germans attacked them from the front, using two of their battleships, surrounding the British contingent. They then moved a smaller force of their remaining ships and other battleship to split the British force in half, just like they did to the Allies at Singapore. The British Pacific Task Force was defeated and scrambled in retreat, with two of the British battleships being destroyed, one being scuttled to prevent its capture by the Germans. The British defeat turned the weight of the Pacific War fully into the German's favor, but was unsuccessful in gaining the Japanese to their cause.
In the end the Japanese threw 45,000 soldiers into an attack against German New Guinea in August of 1917. The Germans were able keep the Japanese at bay, but knew full well that once Japanese were able to bring in reinforcements that they would be crushed in any major land campaign. In the end the Germans decided their best option would be to sign a seperate peace with the Japanese, ending the war in the Pacific in a stalemate with terms acceptable to both sides. The Germans offered the Japanese terms by which the Germans would would remain in control of Singapore and New Guinea, while the Germans would turn a blind eye to Japanese expansion in the Pacific for 20 years, agreeing not to go to war with them. The Japanese accepted these terms, instead focusing on building up their own military to allow for greater expansion in the Pacific, especially aimed towards China. The Peace of Kyoto was signed on August 28, 1917, ending the Pacific Campaign, the Germans hadn't defeated the Japanese as they had hoped to, but they did defeat the British and the Pacific was now outside British hands.
War at Sea
Germany and Britain had been in a naval arms race since the 1890's, they were then the two primary naval powers in the world. Their navies had grown to encompase and protect their global colonial empires, and supported by a massive industrial complex which extended across their respective homelands. The British changed the game forever when they finished work on the HMS Dreadnought in 1906, weighing in at 18,410 tons, spanning 527 feet long, moving at 24 mph, and carrying a total of 36 guns. The Germans and the British spent the remaining eight years between the Dreadnought and World War I rapidly building numerous new ships of this new class of super-battleships. When World War I finally came to Europe, it was only a matter of time as to when the British and German Navies would clash in the North Sea.
Blockade of Europe
With the beginning of the war the British Royal Navy scrambled to bring together a force to fight the German High Seas Fleet. In August of 1914 the British gathered together the Grand Fleet from elements of the Second and Homes Fleets that included 35 capital ships and was placed under the command of Admiral Sir John Jellicoe. The Grand Fleet was based around Scapa Flow of the Orkney Islands, and was given the task of blockading Germany's ports on the North Sea. The British issued a list of contraband products that could not be delivered to Germany under the British blockade, and by November even foodstuffs were considered contraband in this unlikely situation. Although the British successfully maintained a blockade of the North Sea at this point in time, Germany's ports remained in the hands of the Germans. The blockade was met by a countering U-boat campaign by the Germans, who wished to use their massive submarine force to lead the counterattack on the Grand Fleet and the Home Islands.
The German U-boats achieved numerous successes in their counterattack sinking numerous British warships, but maintaining a strick doctrine of not attacking civilian ships. The Germans sunk began their campaign by torpedoeing the light cruiser HMS Pathfinder on September 5, which sank in just four minutes. On the 22nd the U-9 had spotted several vessels on the horizon, and thus submerged to investigate these potential targets. What it discovered was three British cruisers, the HMS Aboukir, HMS Cressy, and HMS Hogue, all old-fashioned ships and populated predominately with reservists. The ships were in the process of being retired, but with the bureaucracy growing inside the Admiralty they were not retired yet. The Aboukir was sunk by a torpedo, and the captains of the other ships assumed it had hit a mine and moved to assist the ship. The U-9 hit both of the other ships with two torpedoes, each, and all of the ships were sunk within a single hour. The crew of the U-9 became national heroes, after they lead the counterattack against the Grand Fleet, sinking several more cruisers over the course of the year.
On Novemeber 23, a squadron of U-boats, roughly five, movedc into Scapa Flow, almost undetected through the Hoxa Sound, where a squadron of ships were anchored. Several cruisers and numerous other ships like destroyers and trawlers were docked in the area, which the U-boats moved in to attack. Two cruisers were sunk, as were two destroyers, several more destroyers were damaged and numerous other trawlers were damaged. The attack created outrage in the Admiralty's command over the conduct of the Grand Fleet against the U-boats. But the worst attack came on December 31 of 1914 when a U-boat spotted the HMS Formidable, a British pre-dreadnought battleship, and proceeded to torpedo it as it was participating in exercises. The incident lead to the Channel Fleet's commander, Admiral Sir Lewis Bayly, being stripped of his command for negligence. Although its likely that the loss of the battleship was not due to the mistakes of any one man, the frustration of the Admiralty in 1914 is likely what lead to the firing of Bayly.
At the beginning of 1915 the Germans began switching their attacks from military to merchant targets, attacks that began back in October 1914 now escalated from isolated incidents to part of their doctrine. But the Germans were ordered by their commanders to maintain that all merchant ships being attacked had to be flying the British flag. British losses in the early months of 1915 were atrocious, with as much as 90,000 tons sunk in February of 1915 alone. With the escalation of the naval war in these early months, the British began to apply the same convoy system they used with transporting soldiers across the Atlantic to their merchant ships. Before this the best options they gave to their merchant ships were to ram the U-boats, which would force them to submerge. But now with convoys being applied the British had less capital ships with which to maintain the blockade against the High Seas Fleet.
Over the course of 1915 the Germans and British fought several minor naval skirmishes, although none actually involed any big battleships, mostly just cruisers and trawlers or steamers. The Germans had defeated the British in a decisive battle at Coronel off the coast of Chile in November 1914, crushing them with a squadron of cruisers. The reinfroced sqaudron was then again victorious in December 1914, defeating a British squadron lead by two battlecruisers and commanded by Doveton Sturdee, who died in the battle. In the battle the two battlecruisers, the HMS Invincible and HMS Inflexible, were sunk, as were two of the three other cruisers engaged in the battle, again humiliating the British. The far-stretched fighting in the South Atlantic was to capture the help of the South Americans and their agriculture for the European combatants. Chile and Argentina favored the Germans, while Brazil favored Britain and the Allies, and after two battles at sea that were fought off of Chile and Argentina, the countries of South America were made fully aware of the German victories. While the blockade failed to let the Germans capitalize from these successes immediately in resources, the international support and pressure did help.
Battle of Jutland
Throughout the rest of 1915 the combined forces of the war maintained a balance in the Northern Atlantic, neither side was ultimately able to overpower the other. Also neither side was willing to engage their forces in a risky climactic battle in which the chances were likely only 50-50 to win. The British had planned to launch an offensive against German U-boat squadrons that had been ambushing British ships off Denmark since early 1916. But the Germans had intercepted and interpreted British Naval Intelligence message about these movements, including that the force doing so would include 8 British battleships. To protect their U-boats and to draw the British into a trap, the Germans combined three naval squadrons into a substantial force consisting of 24 battleships, ten battlecruisers, seven pre-dreadnoughts, 17 cruisers, and 61 torpedo boats. The British force in the initial engagement had eight battleships, four battlecruisers, 14 cruisers, and 34 destroyers, whose purpose was be the major force in destroying the Germans.
On May 31, the British began their inital attack into the Jutland area to defeat the German forces in the area, especially U-boats who had been operating in the area. When the Germans moved to engage them in battle, their battlecruisers, which both sides had placed on their opposing flanks in the opening of the battle, began the fight. At 14:00 the two forces spotted each other, which was slightly suprising to the British, who initially thought the forces they were meeting were Danish. The Germans inflicted severe damage on a battlecruiser before they came to the realization these were Germans ships, which they had to make through dense fog. At 14:32 the British battlecruiser broke off and moved closer to the Germans and moved in parallel with their main forces. It was under this course that the German big guns demolished the British battle cruisers and with that the British left flank was exposed. At 15:22 the British moved southeast to try and cut of the German ships, but the German battlecruisers outmanuevered them and slowed them down before they could cross the German ships.
With this the Germans now counter-manuevered to cross the British T and fire upon their cruisers at the head of their force. As soon as the Germans sighted the British battleships they worked to break the major British ships that seperated them from the battleships. The British circled around, deciding it was time to retreat, but the Germans with the advantage manuevered around them in a circle, and the British were only able to withdraw to the northwest at 16:21. The British fleet had lost two battleships, all four battlecruisers, seven cruisers, and 12 destroyers in the opening engagements, the German losses were at one battleship damaged, one battlecruiser sunk, two damaged lightly, and five torpedo boats lost. With this victory the British Fleet limped back north, where they would meet up with a naval contingent commanded by Sir John Jellicoe. The British forces convened at around 18:00, and moved east to engage the Germans, who they finally found late at around 20:00.
The British had deficiencies in night fighting, which Jellicoe knew of, but insisted that the British continue to fight the Germans to avoid a possible total defeat. The British smashed their forces into an all-out attack on the German left flank, focusing, as usual, on rapid fire, while German well-aimed fire took its toll on the British ships. Eventually the British manuevered to the northeast, becoming parallel with the German force, and engaging them. The British failed to score any major win, but the Germans had the advantage as the battle dragged on through the nigh and on into the early morning. When the time hit 0:12 on June 1, the British forces broke northwest and ran away from the victorious Germans, who moved to deal the crushing blow they had so long awaited. The Germans moved to manuever around the British and cut them off, but only lightly engaged them until the British finally escaped. Only when daylight broke on the North Sea at around 7:00 did the two sides finally realize the full extent of the damage they had inflicted. The British had lost eight battleships in total, along with a large number of other capital ships, while the Germans had lost only one battleships with two more damaged, but not severely.
With the end of the Battle of Jutland, the War at Sea turned now into the German favor, now that the British Grand Fleet had been crippled so much. The Germans now had gained the upper hand and spent the rest of 1916 fighting several more battles against the British Grand Fleet, slowly but surely grinding down Britain's naval dominance. The German High Seas Fleet was in control of the North Sea by February 1917, and the British blockade of Europe was ended. Admiral Jellicoe was severely criticized for this crushing defeat by the Admiralty, but faced little punishment for the loss. The Germans now prepared to combine their capital and U-boat forces for a crushing blow to Britiain that sought to turn the tide of the war.
Starving Out Britain
In the Spring of 1917 the German High Seas Fleet began raiding Allied supply lines that ran between the English Channel. Meanwhile, German U-boats were able to establish supply lines with the Irish rebels of the Easter Uprising at this point, transporting guns and ammunition across the Channel and Irish Sea. The Germans also ventured out into the North Sea off of Scotland, where much of the Grand Fleet was stationed. They made routine raids on the Scottish coast, sometimes with surface ships, sometimes with U-boats; either way they took their toll. The German General Staff knew that if Britain could be cut off by sea from her supply lines, she would surely buckle under. On May 18, 1917 Grand Admiral Prince Henry of Prussia approved an official blockade of Britain, drawing up a plan for the attack. The idea would be to use U-boats to attack British and other Allied ships at sea, while using capital ships to close off the English Channel and slowly cuting off Britain from the Atlantic. Britain got imports from all over the world, with much of it coming over from British India, South America, and the United States. After the Ottomans cut off British control of the Suez Canal in 1917, the British no longer had access to India.
The High Seas Fleet started by raiding ships in the Straits of Dover, the main Allied supply line with Britain. Eventually by the summer of 1917, the High Seas Fleet had reach and control over half of the English Channel, which left the Allied forces in northern France under the threat of being cut off from British supply lines. The Irish Sea was also coming under increasing attack from the German U-boats, which threatened to cut off the British forces who were fighting the Irish Uprising. But with increasing pressure to turn up the heat on Britain, Germany saw an increase in United States imports to Germany, who was clearly gaining an edge in this war. Now the British Grand Fleet could not maintain a Blockade of Germany as their forces were depleting fast and the possibility that they would anger the Americans became too great. Eventually they were forced to drop the blockade and move their forces to concentrate in the English Channel, Irish Sea, and to keeping enemy shipping from getting to Britain. This included countries Britain recognized as "Friends of the Enemy," which included mainly Argentina, Chile, and the United States. Some ships, especially American ones, would be allowed to continue travelling, but many would also be stopped and stripped of any food under the commander's orders.
The United States got increasingly angry at Britain for stripping its ships of their product, but Britain would often just rebuff the issue. As a majority of ships were getting to their ports in Germany and Northern Europe, but those that didn't were often made cases of public outcry about Britain's blockade. While Germany was attacking and destroying shipping going to Britain and France similarly, these ships were mostly from Brazil and Britain's overseas possessions like India. The British eventually turned towards supplies coming in from North America to try and even out the shipping lanes, increasing imports from Canada and Mexico. But eventually the war would reach across the pond into North America when on June 2, 1917 a British cruiser sunk an American merchant vessel off the coast of Spain. The public screamed for war against Britain, even though the British said it had simply been an error in identification. This was then coupled on June 16 when the Balfour Letters were made public, a series of messages sent to the Mexican government under Venustiano Carranza. In these letters they asked that Mexico declare war on the United States in exchange for territory lost to the United States in the Mexican-American War. After public opinion completely turned against the British, the new President of the United States, Woodrow Wilson, asked for Congress to declare war on Britain and Mexico, who was eager to join the war against the United States. He was granted his request on July 2, 1917.
With this the United States ships that went to and from Germany became prime targets for the Royal Navy, but as American ships took a wide range of routes to get to and from Europe the British were stretched even thinner. With the adding of America's impressive Navy into the battle, the United States and Germany agreed to a two-sided naval campaign to put the pressure on the British Navy. Throughout the rest of 1917 the Central Power Navies slowly strangled the British Grand Fleet towards its ultimate demise. American ships were being sent across the Atlantic in ever-growing convoys to protect shipping, a strategy which worked to great success in keeping Germany and the United States' respective lifeline open. It did not take long after this for the High Seas Fleet to be able to link up with American ships in November, ceremoniously marking the defeat of the British Navy, but they still existed in the ports of the British Isles.
Eventually, the Germans turned the tide on Britain and launched a Blockade of Britain, refusing to allow any shipping to enter British ports, including Brazilian. Although the Empire of Brazil did desire British trade, they did not have the resources to fight a war against Germany and the United States, especially when Argentina and Chile served as threats to Brazil on land already. Slowly but surely the combined Central Power forces cut Britain off from her supply lines. When 1918 rolled around the German Spring Offensive marked the end of the war in France, the Germans could now turn their complete attention to ending the war and defeating Britain. In their Hundred Days Campaign a combined force of the Navy and the German Air Corps wrought chaos across the Isles. They blew up British capital and merchant ships in port, bombed major British cities like London and Bristol with Zeppelins and bomber aircraft. This reign of terror eventually brought Britain to its knees as the reach of the German Armed Forces was shown and the threat of a German invasion grew near. Eventually the British decided finally to end the war and agreed to an Armistice with the Central Powers; the war was finally over.